Home › AI Agents › Hermes on a Hostinger VPS: A Step-by-Step Setup Guide
Hermes on a Hostinger VPS: A Step-by-Step Setup Guide
In my last post I wrote down all my questions about Hermes. This is the first practical one: how do I get it running on my own server, without it taking all weekend? Below is every step, in the order I did it, with the screenshots I took along the way.
TL;DR I set up Hermes Agent on a Hostinger VPS and made it usable without leaving it open to the internet. What this post covers:
- Server: a KVM 2 VPS with Hostinger’s Hermes template, deployed in a few clicks.
- Model: my ChatGPT subscription instead of API keys. The login has to be started with
hermes modelin a real terminal. - Chat: a private Discord bot on my own server, limited to my own user ID.
- Lock-down: Hostinger’s firewall now allows only SSH. The dashboard URL and a random port that Docker had published are closed.
- Watch out for: special characters in the admin password (
$,#,%), a bug in Hermes v0.21.2 that makeshermes modellook frozen and keeps the dashboard chat on “Setup Required” unlessAWS_EC2_METADATA_DISABLED=trueis set, and the fact that the bot only answers in server channels when you @mention it. - Not in this post: SSH hardening and access from my laptops, more models, email, calendar and Drive, backups, and Hermes’ permissions. I collected them at the end for the next posts.
What you need
- A Hostinger VPS. Aim for at least 2 CPU cores and 8 GB of RAM, according to Hostinger’s Hermes tutorial. The Hermes container itself uses around 1 GB, or 2–4 GB with browser automation enabled.
- Access to a language model. Hermes deploys even without credits, but then you have to add your own provider credentials before it can run tasks. For this guide I use my ChatGPT subscription. Which providers make sense for which agent is a topic for a next post.
- A Discord account (free) for step 3.2. Alternatively, you could use Telegram.
- Time. Some guides estimate 45–60 minutes for a first-time setup.
Step 1: Get a VPS ready
First, a fork in the road. At the time of writing, Hostinger offers two ways to run Hermes:
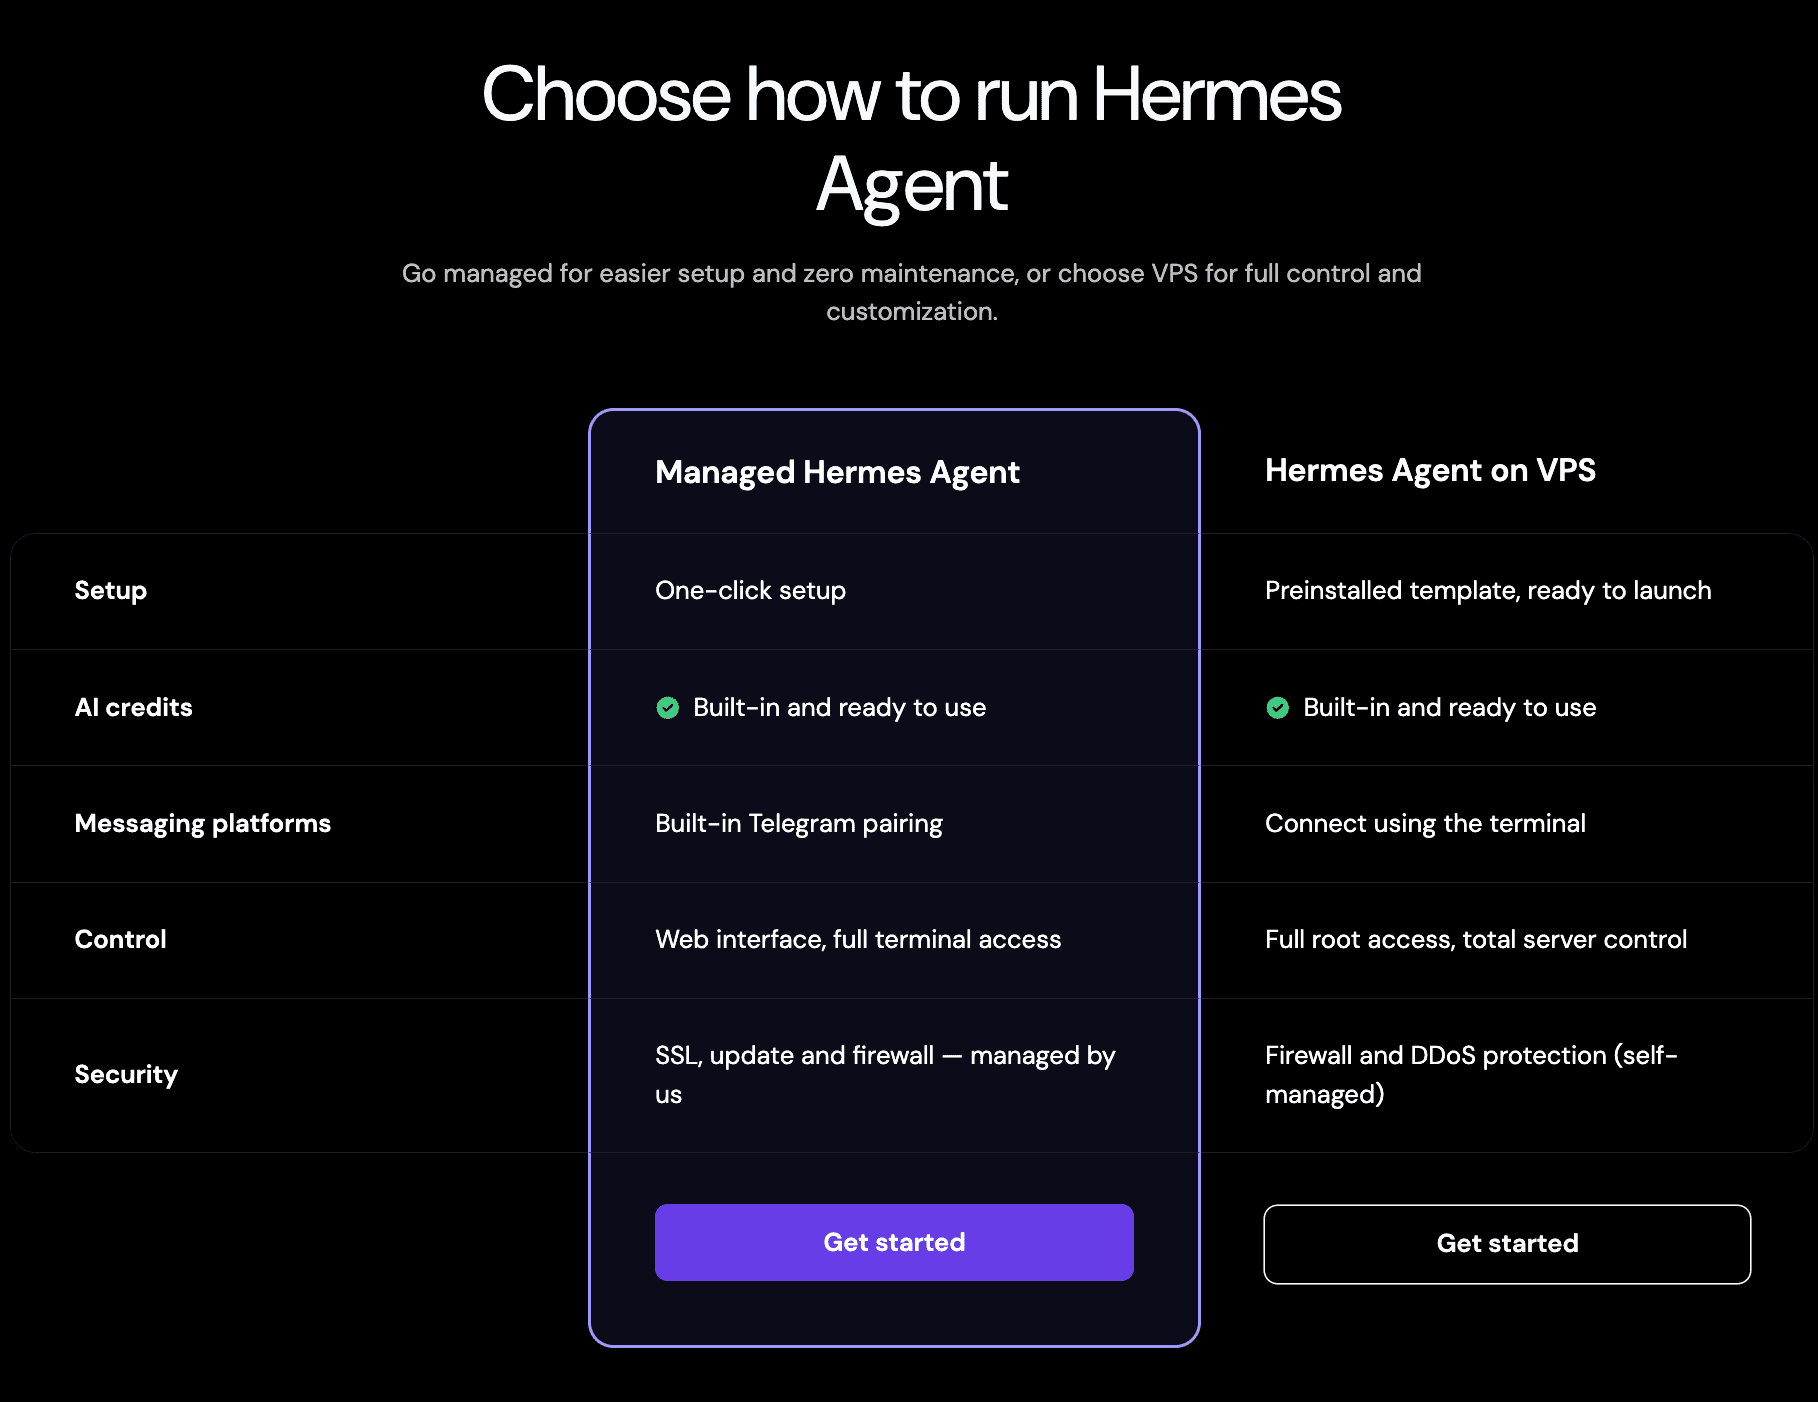
- Managed Hermes: one-click setup with built-in Telegram pairing and a web interface. Hostinger takes care of SSL, updates and the firewall.
- Hermes on a VPS: a preinstalled template on your own server. You connect via the terminal, get full root access and total control, and you look after the firewall, updates and security yourself.
I went with the VPS because I want full root access and complete control. But that freedom comes with responsibility: you’re the one who has to set everything up correctly and keep it secure. If you’d rather not think about servers at all, managed is the more relaxed choice. (Hostinger’s tutorial compares both.)
Here is what I clicked through to get my server:
- Plan: I chose KVM 2, and Hostinger’s Hermes Agent template then installs everything automatically.
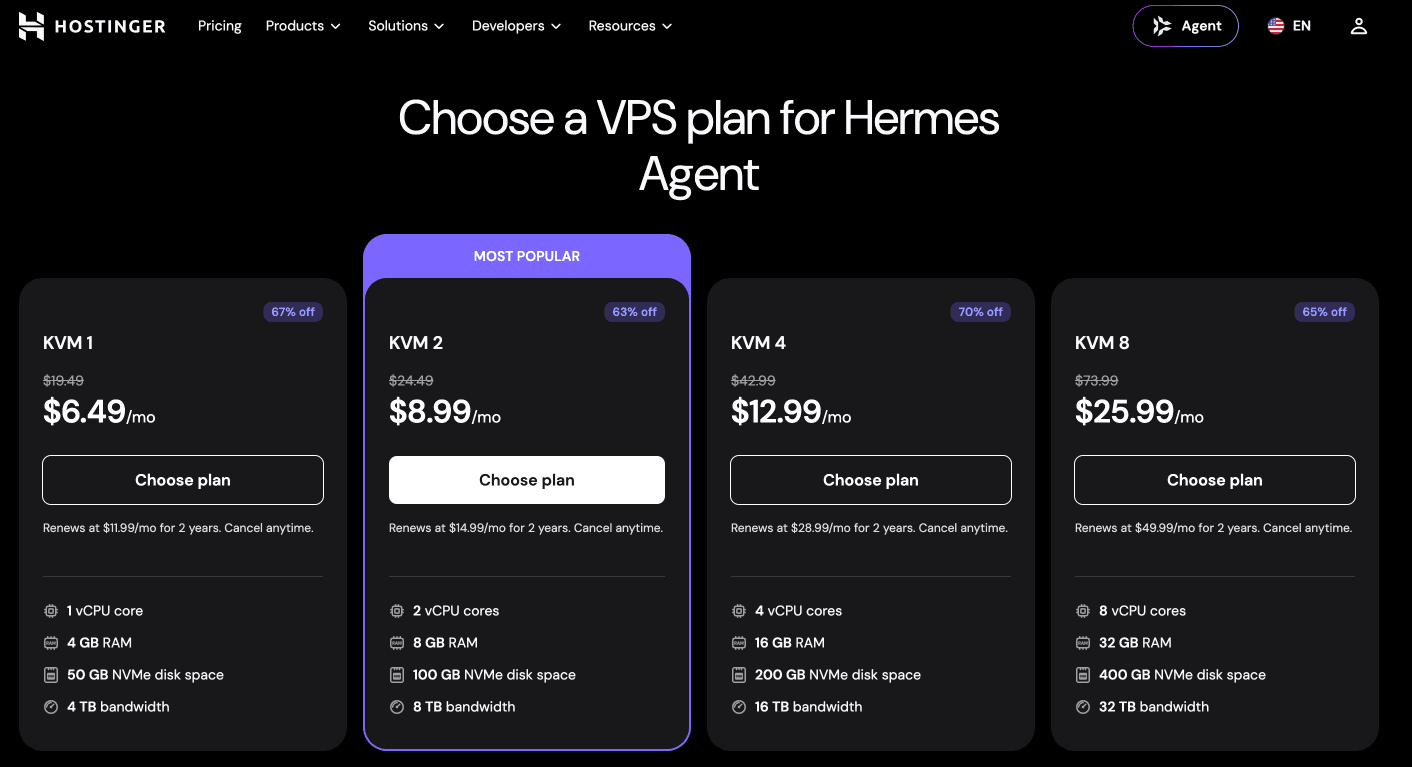
- Billing period: monthly, yearly or 24 months.
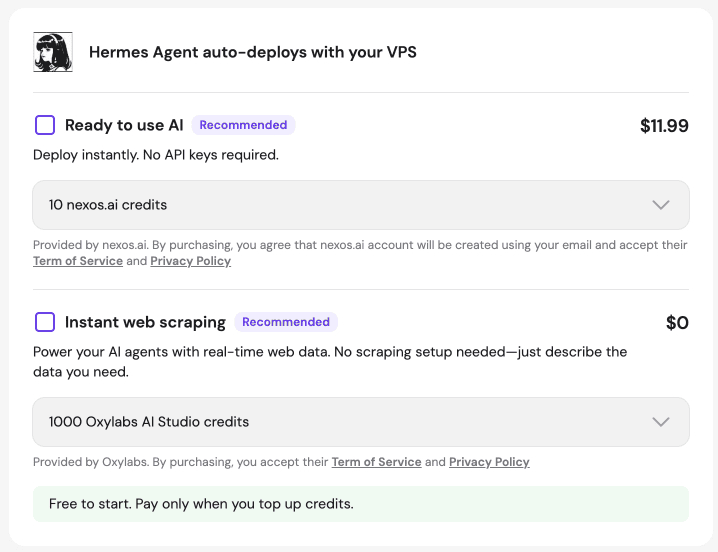
- Add-ons: I skipped all of them. That includes the two Hermes extras, “Ready to use AI” (nexos.ai credits for models) and “Instant web scraping” (Oxylabs credits), because I’ll connect my own model providers in the next post. I also left out agentic mail and the automatic daily backups. That means backup planning is on me. Hostinger’s free weekly backups run by default, and I’ll come back to backups in a later post (see the notes at the end).
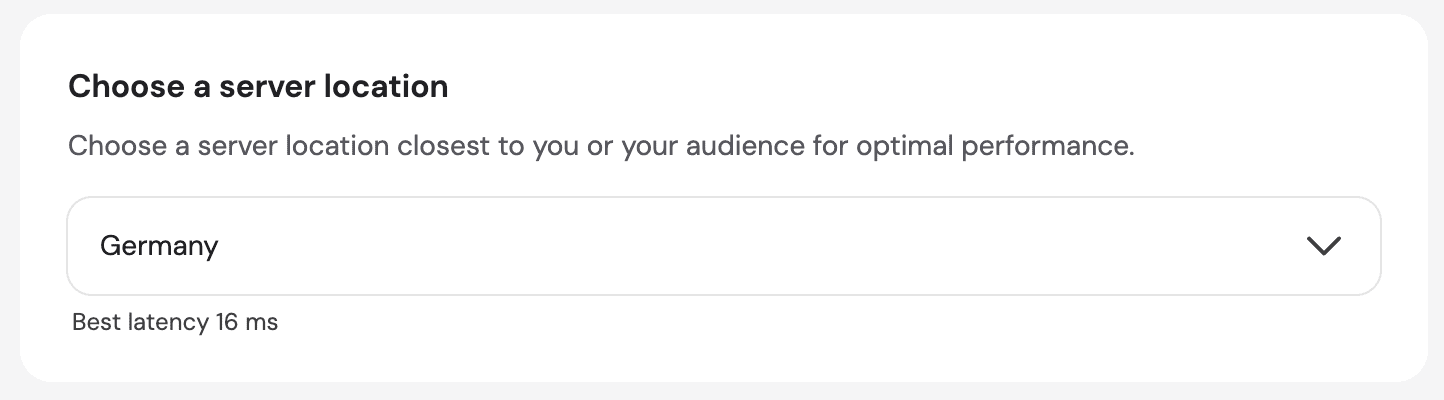
- Server location: Germany.
- Coupon: I used a code from a YouTuber’s video about Hostinger and Hermes, which gave me another 10% off.
- Pay.
Because I started the order from Hostinger’s Hermes Agent VPS page, the process didn’t end at a plain server dashboard. Right after the payment I landed directly in the Hermes configuration:
- Admin username and password: choose both and store them in a password manager.
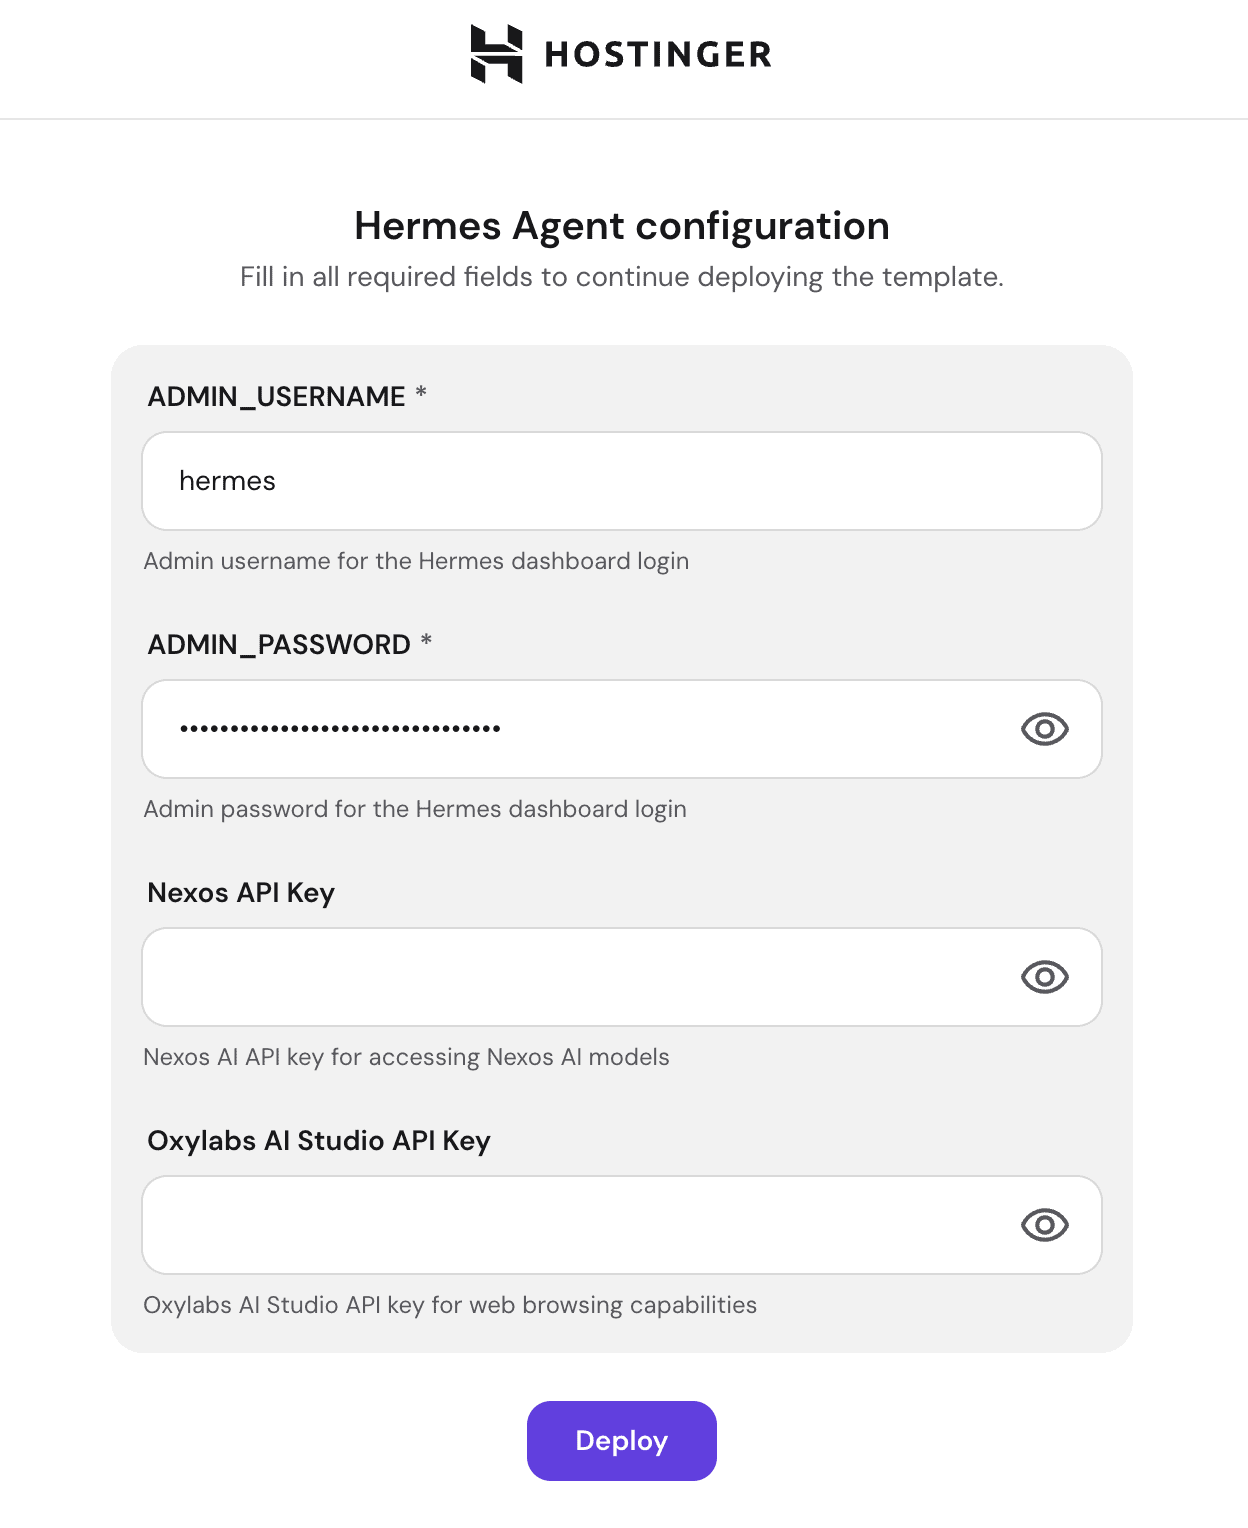
- Nexos and Oxylabs fields: I ignored them (see the add-ons above). You can connect model providers later.
- Click Deploy.
- Wait a moment. Hostinger forwards you to the Docker Manager, where Hermes shows up as a project. Behind the scenes, the platform creates and starts the Hermes container plus supporting services such as Traefik. For me that took about 30 seconds.
Step 2: Sign in to the Hermes dashboard
When the deployment has finished, click Open next to your Hermes project in Docker Manager.
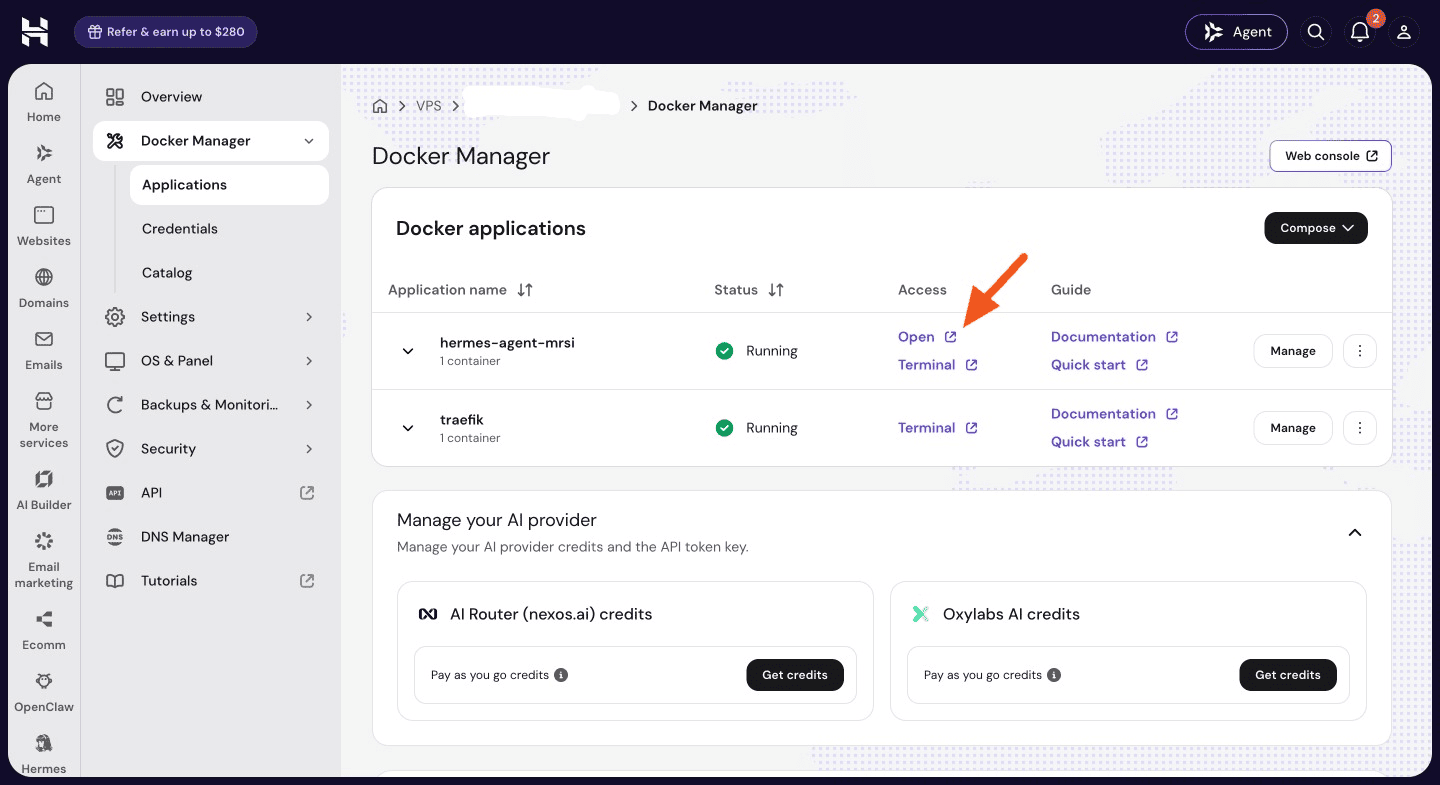
That takes you to the Hermes Agent dashboard with a sign-in page: username and password, the ones you chose in step 1.
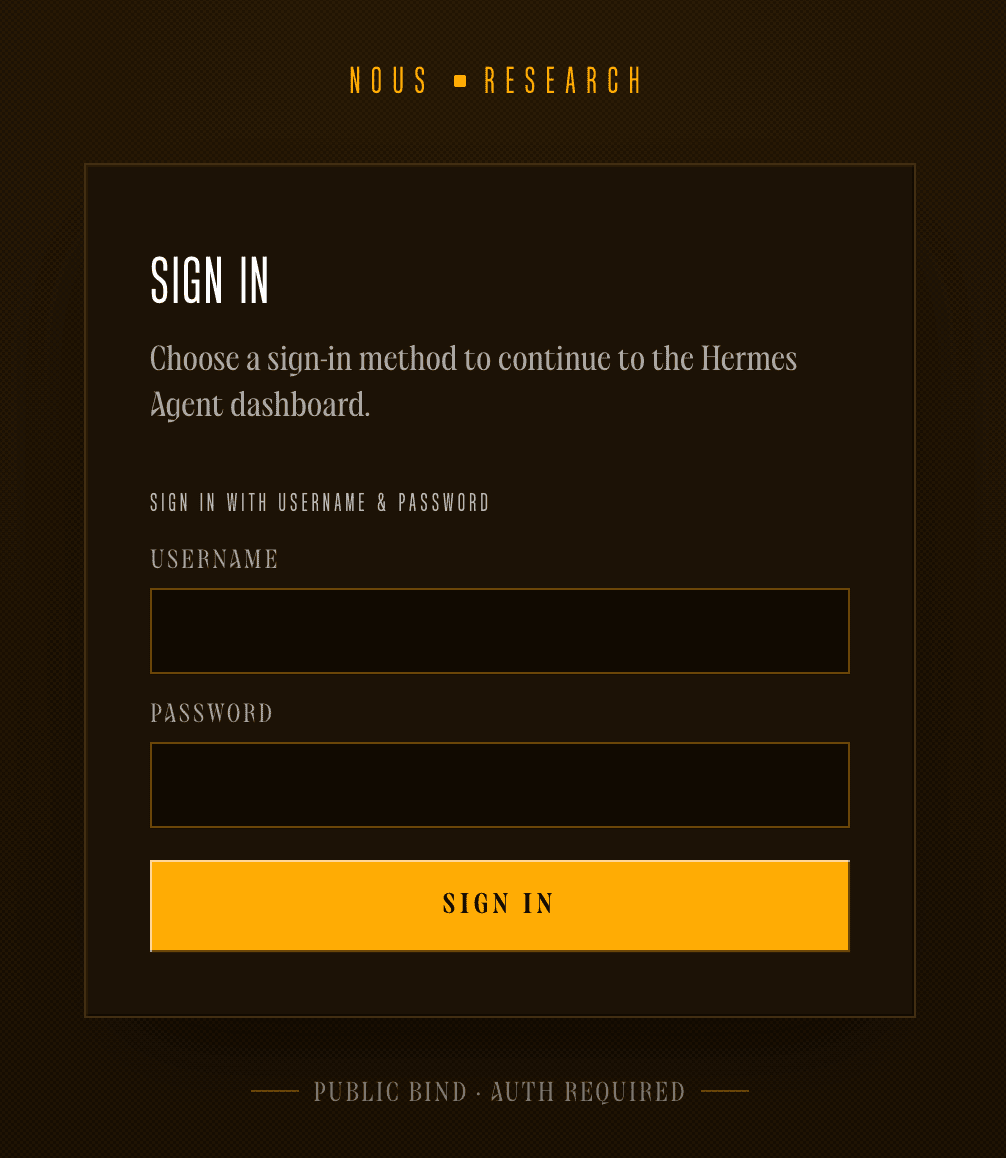
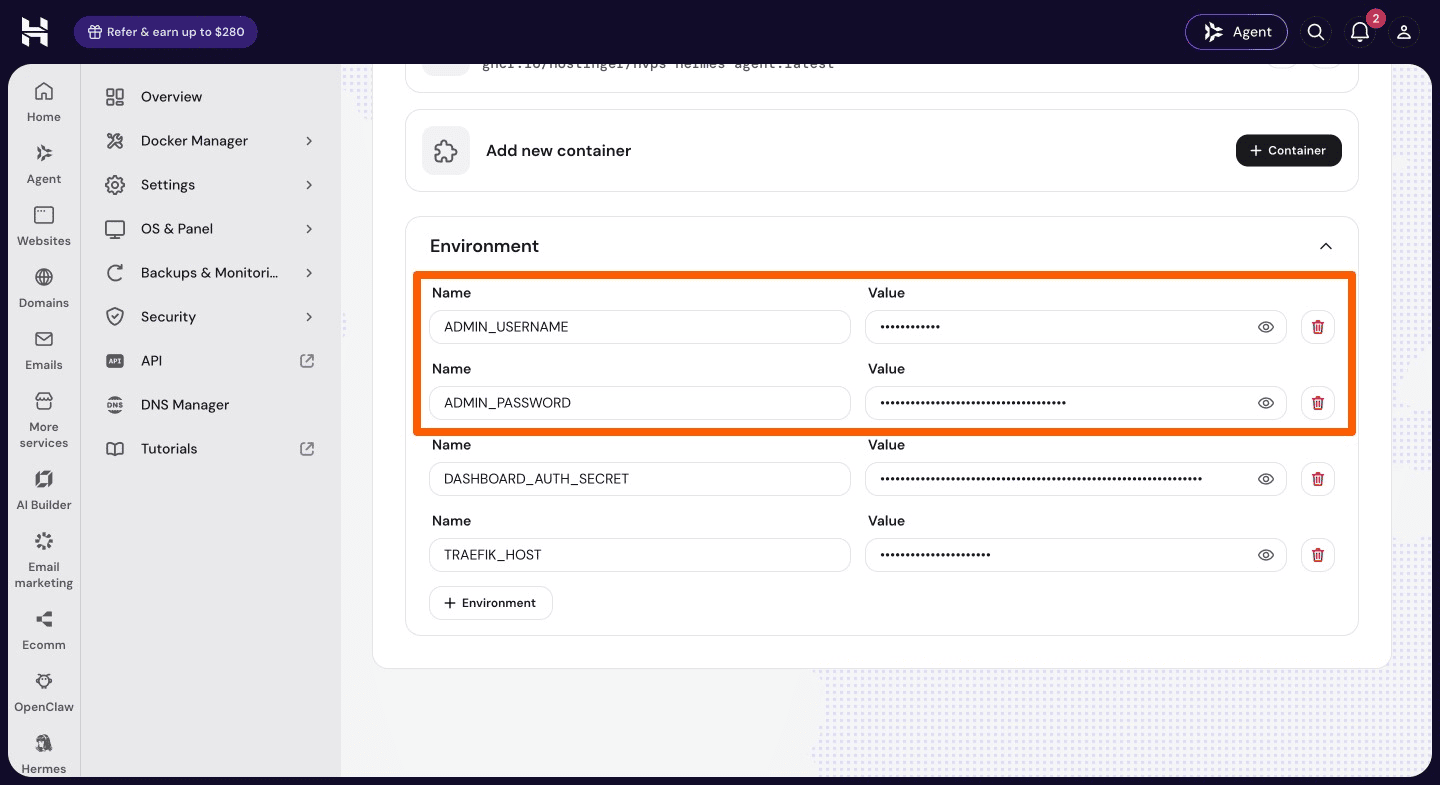
“Invalid username or password”, although both were correct. I had saved both values in my password manager and still got the error. To double-check, I looked up the credentials at the source: in the VPS dashboard, go to Docker Applications → Hermes Agent and click Manage on the right. That opens the Docker Manager, where the Environment section shows the username and password, ready to copy. Mine were identical to the ones in my password manager, and the error stayed.
The culprit was my password. It had 40 characters, including $ and #. I generated a new one of the same length without $, % and #, saved it under Environment, redeployed Hermes in Docker Manager, and the login worked right away. I didn’t isolate which character caused the trouble, because I removed all three at once. Special characters in environment variables can be misread by the tools that process them, so they are a plausible suspect.
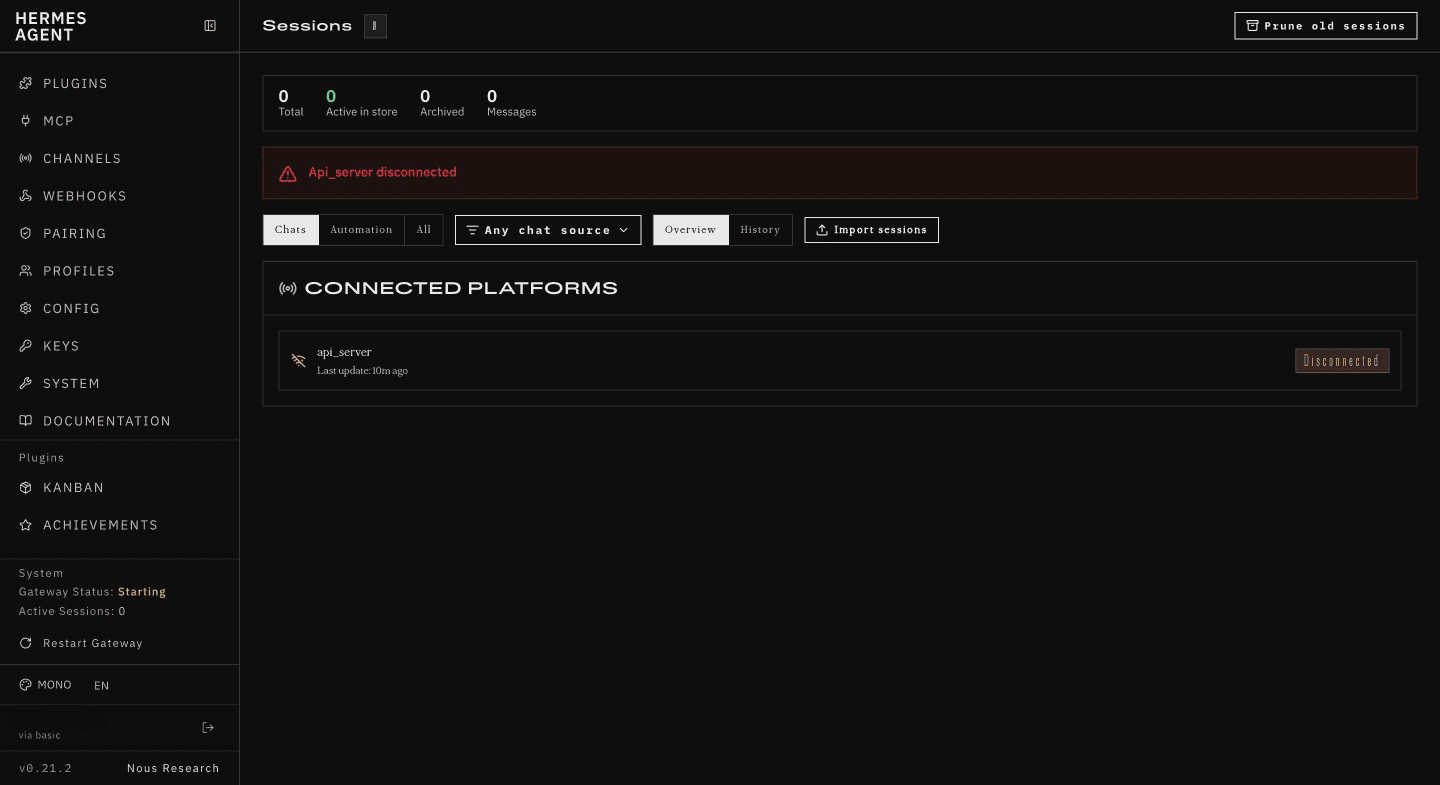
Here is what I saw right after signing in: no setup wizard. Hostinger’s guide describes a short setup flow on first launch, but on my server I landed directly in the dashboard (Hermes v0.21.2 at the time of writing), on the Sessions page. The sidebar offers Chat, Sessions, Files, Models, Logs, Cron, Skills, Plugins, MCP, Channels, Webhooks, Pairing and Profiles. Right after the start, the page showed “api_server disconnected”, and the gateway status was “Starting”.
Step 3: First steps in the Hermes dashboard
Two things to sort out before anything fancy: give Hermes a brain (a language model) and a door to talk through. Hermes’ own quickstart has a rule of thumb I’m happy to follow: get one clean conversation working first, and only then add extras like messaging, cron jobs or skills. So the order is: model first, then Discord.
3.1 Connect your ChatGPT subscription
Hermes can use a ChatGPT or Codex subscription instead of API keys. The provider is called OpenAI Codex, and you log in with a device code (listed in the quickstart). I start here because it means no extra API costs for a first test.
One requirement: Hermes needs a model with at least 64,000 tokens of context. According to the quickstart, most hosted models (GPT included) meet that easily.
- Open the Chat tab. As long as no provider is connected, it greets you with Setup Required: Hermes needs a model provider before the terminal interface can start a session. The screen offers two actions:
/model(configure provider and model in place) and/setup(run the full first-time setup wizard in place).
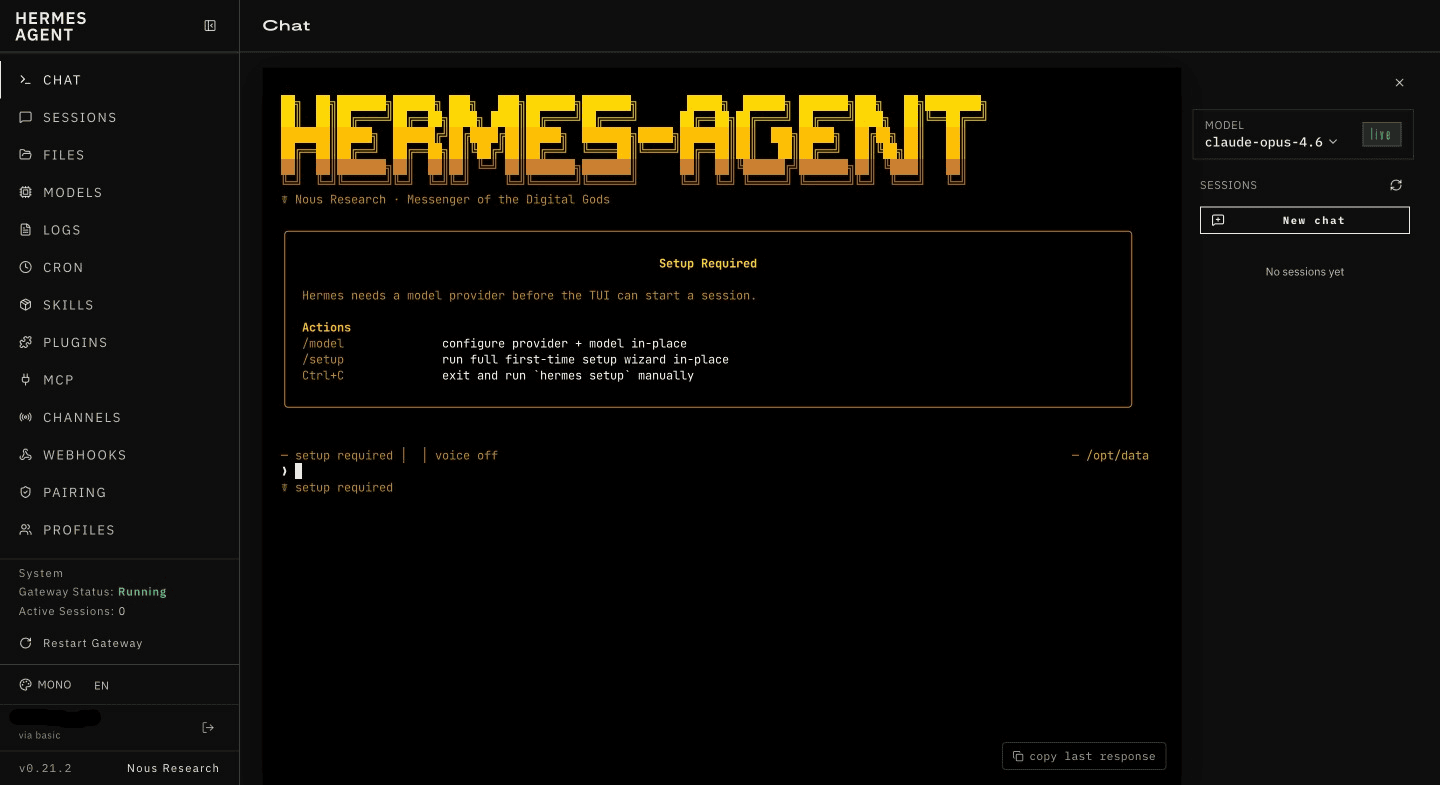
Don’t be fooled by the model label. The Chat sidebar already shows a Claude model with a green “live” badge, and the Models page lists
anthropic/claude-opus-4.6as the main model. That looks like a working connection, but as far as I can tell it is just a preset default, and the chat itself says setup is required. The Models page holds model settings (main model, auxiliary tasks, mixture of agents) that apply to new sessions. The provider login itself happens in the Chat tab.
- Open the model picker. I typed
/model, which only asks for provider and model. (/setupwould start the full wizard instead.) A provider list appears: arrow keys to move, Enter to choose, Esc to go back,qto close.
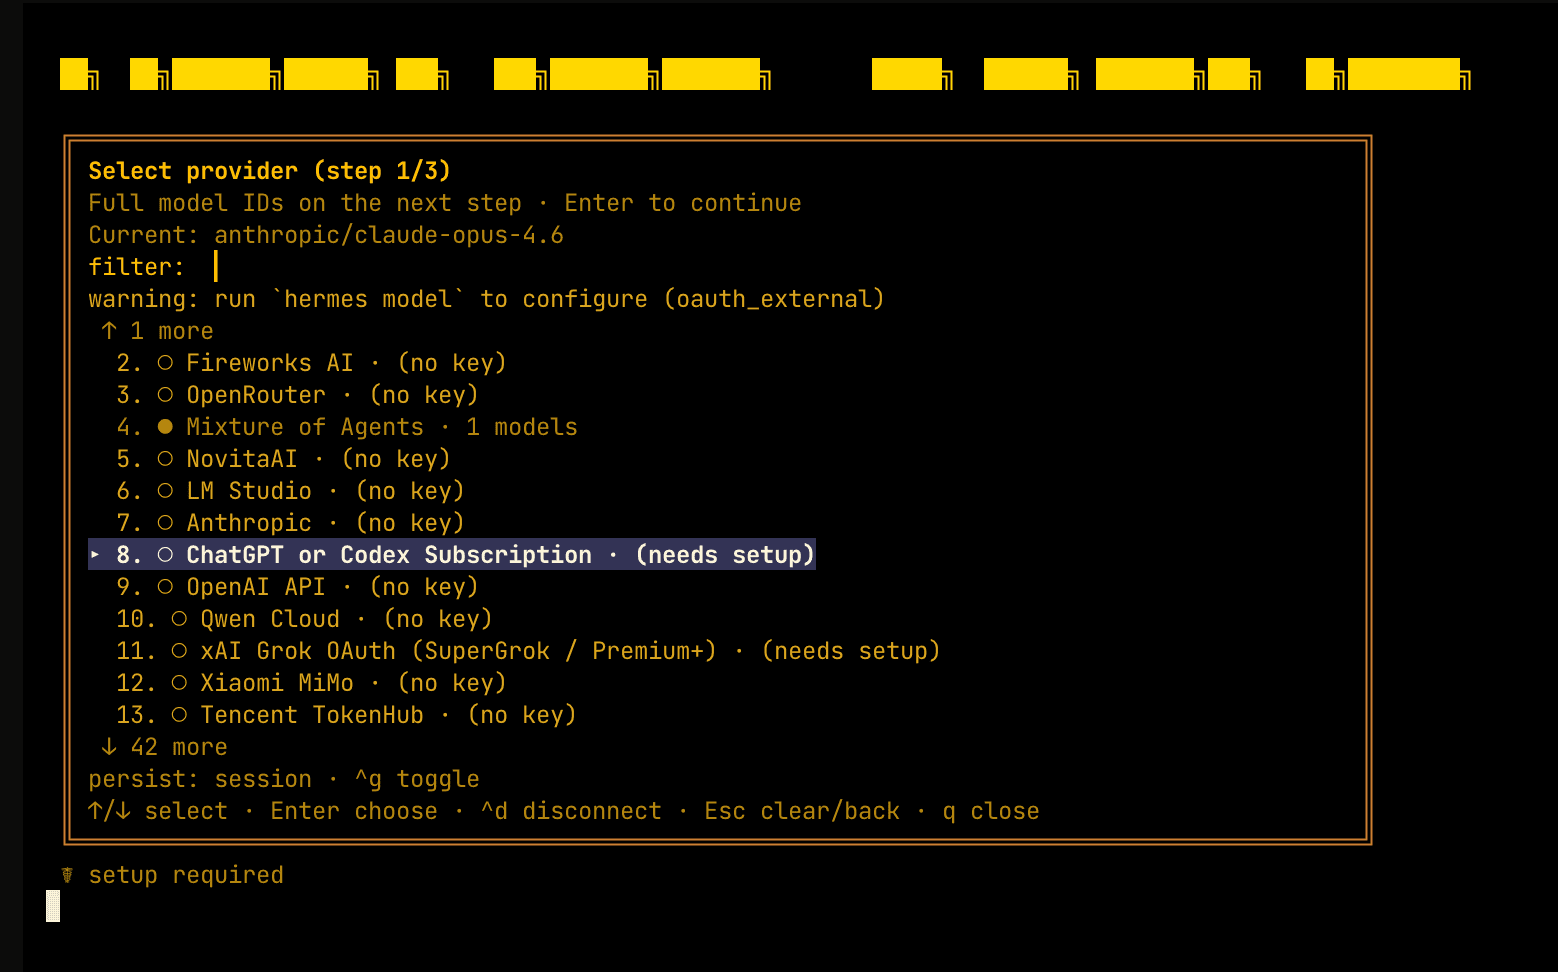
- Here comes the catch. I selected ChatGPT or Codex Subscription and pressed Enter, and nothing happened. The entry is marked “(needs setup)”, and the warning line at the top says to run
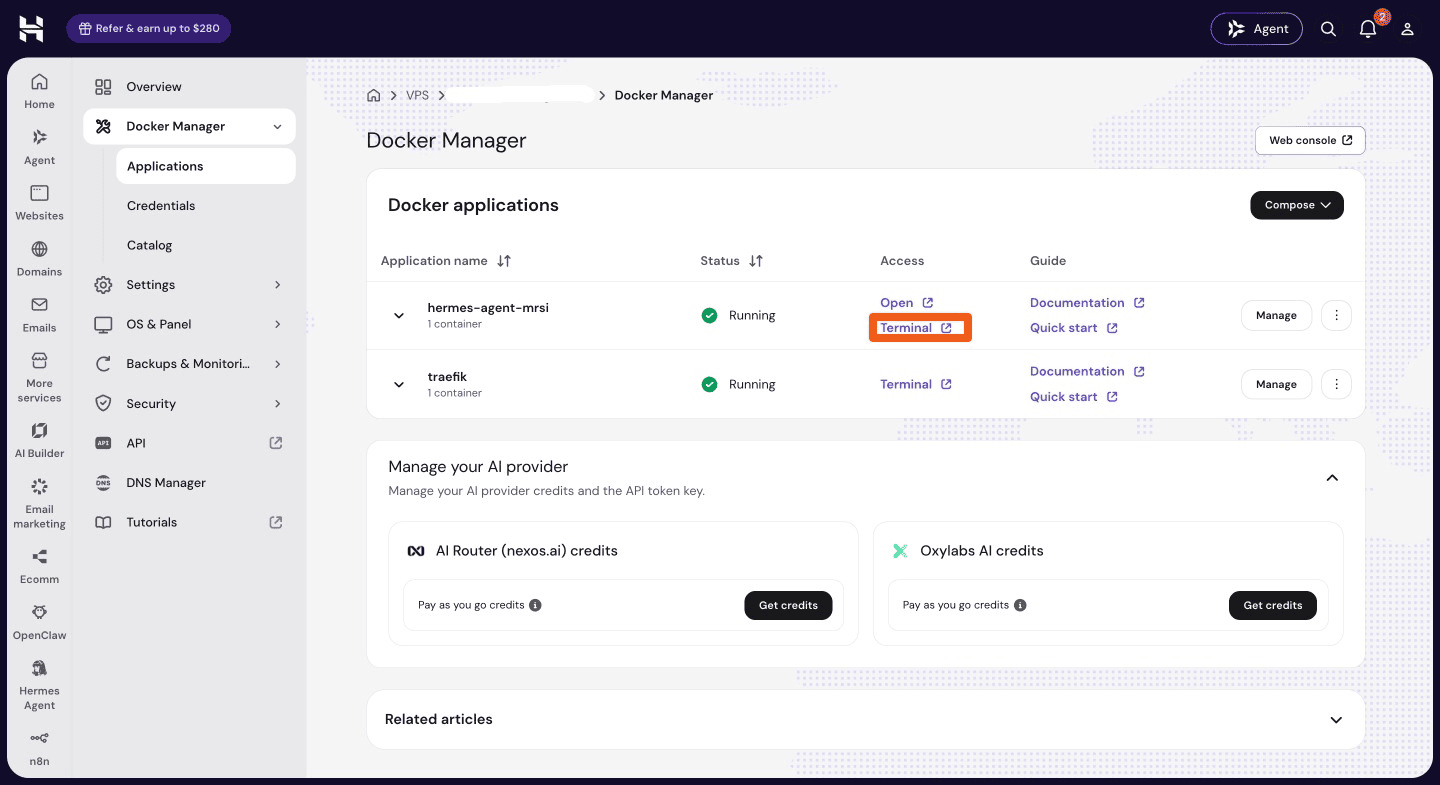
hermes modelto configure it (oauth_external). Logins that aren’t a simple API key can’t be started inside the browser chat pane. This is a known rough edge: a pull request in the Hermes repo describes exactly this behavior (“does nothing”) and fixes it, and my v0.21.2 doesn’t seem to have that fix yet. Close the picker withq. - Open a terminal inside the Hermes container, right from Hostinger’s web interface. No SSH client needed: Hostinger’s Docker Manager lets you open a container terminal straight from the project list. Open your Hermes project and start the terminal for the Hermes container.
- Start the login wizard. First check which user you are:
whoamiIf it says hermes, run AWS_EC2_METADATA_DISABLED=true hermes model. If it says root, run the wizard as the hermes user instead: AWS_EC2_METADATA_DISABLED=true gosu hermes hermes model. (Why the extra prefix? See the box below.) The official image runs Hermes as the unprivileged user hermes, and the Hermes security docs warn that files created by root can be unreadable for the gateway. They say this about pairing commands, but I play it safe here too.
If nothing happens for a very long time: that is a bug in Hermes v0.21.2, not your terminal (I checked with
tty, and it was a real one). An open GitHub issue describes it: with the default settingprovider: auto,hermes modelkeeps calling itself while it looks for a default provider, and on the way it repeatedly asks the AWS cloud metadata service for credentials. On a Hostinger VPS that service doesn’t answer, so every attempt waits for a timeout and the wizard looks frozen. The prefixAWS_EC2_METADATA_DISABLED=trueswitches that AWS lookup off, which should shorten the wait a lot. It doesn’t fix the loop itself, so the bug may still cost some seconds. It worked for me: with the prefix, the provider list appeared and the login went through. The dashboard’s chat pane needs the same fix, so I later set the variable permanently in the Docker Manager (see the box after step 7). That should also make the prefix unnecessary for future terminal sessions.
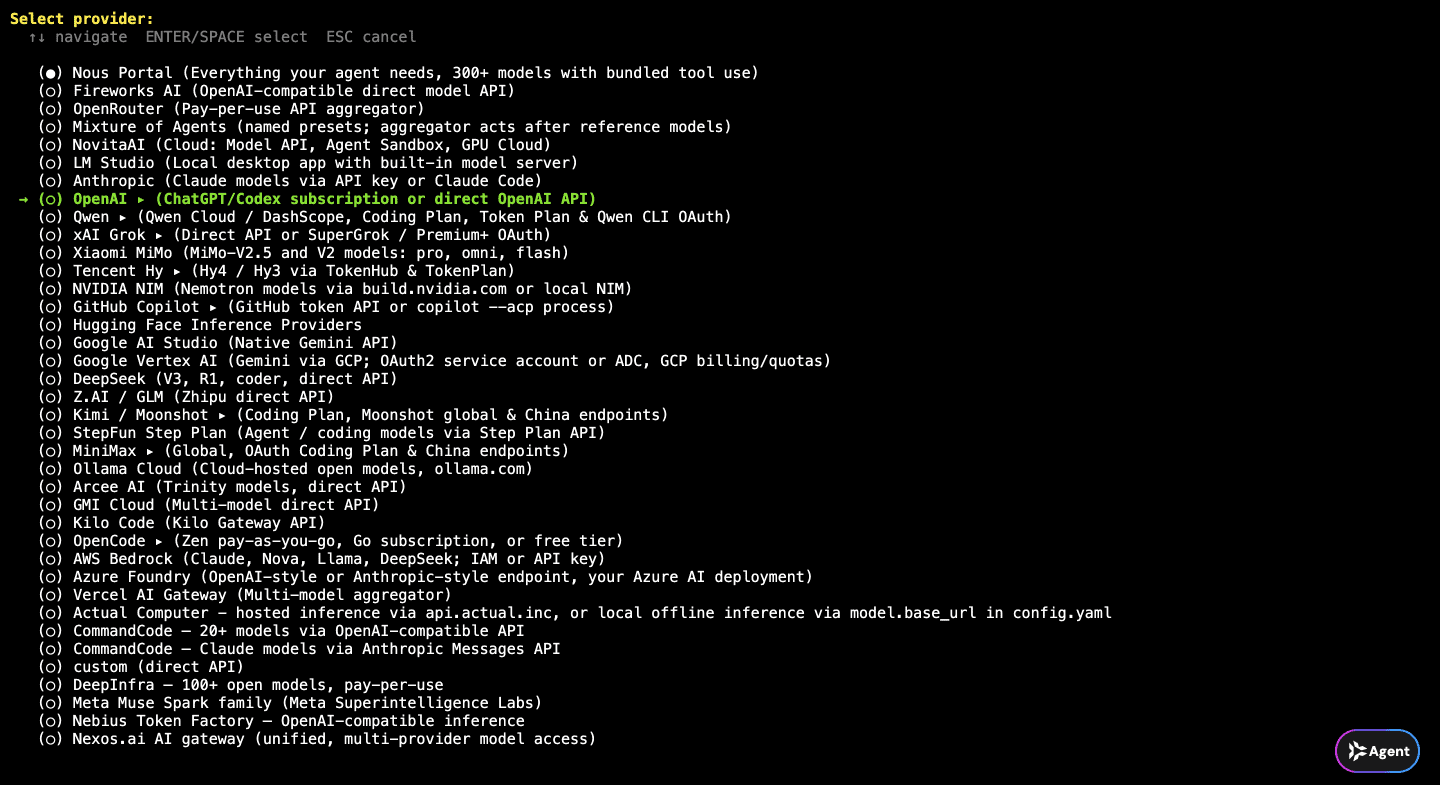
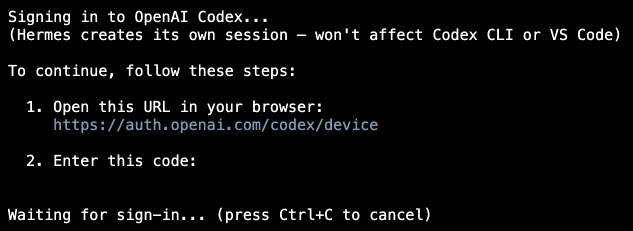
- Choose “OpenAI ▸ (ChatGPT/Codex subscription or direct OpenAI API)” in the provider list and sign in with the device code. In a real terminal, Enter works as expected. The wizard says “Not logged into OpenAI Codex. Starting login…”, then shows a link (
https://auth.openai.com/codex/device) and a short code, and waits. Open the link in any browser, log in to ChatGPT, enter the code and confirm. Hermes stores the login in its own auth store (~/.hermes/auth.json), and you don’t need to install the Codex CLI (see the provider docs).

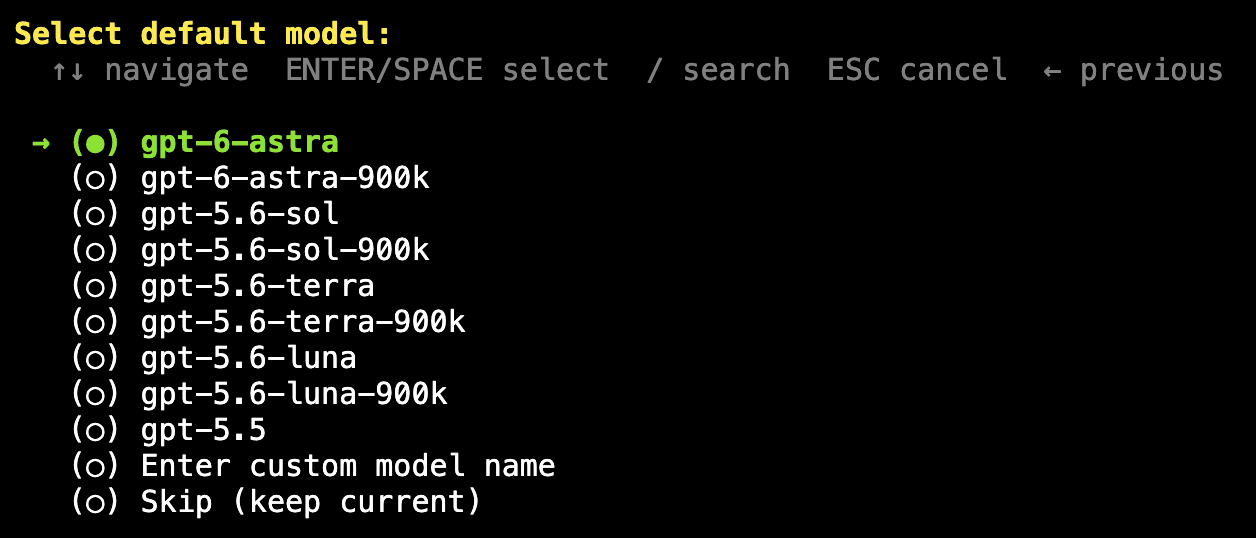
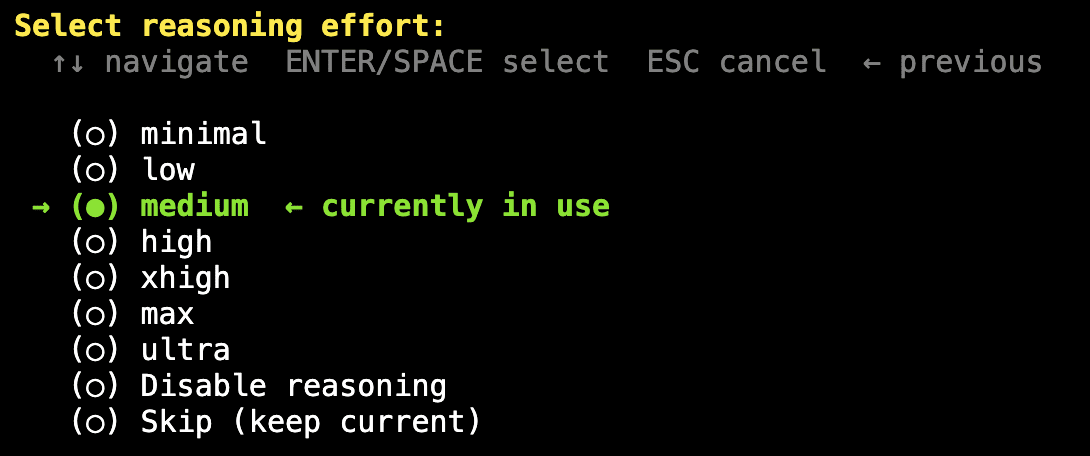
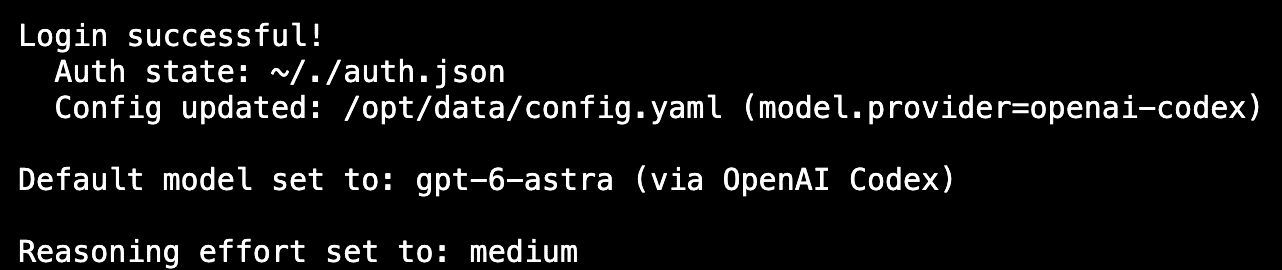
- Check the result. After you confirm in the browser, the wizard prints “Login successful!”, sets
model.provider=openai-codexin the config and picks a default model for you (for megpt-6-astra, reasoning effort medium). You can change both later.
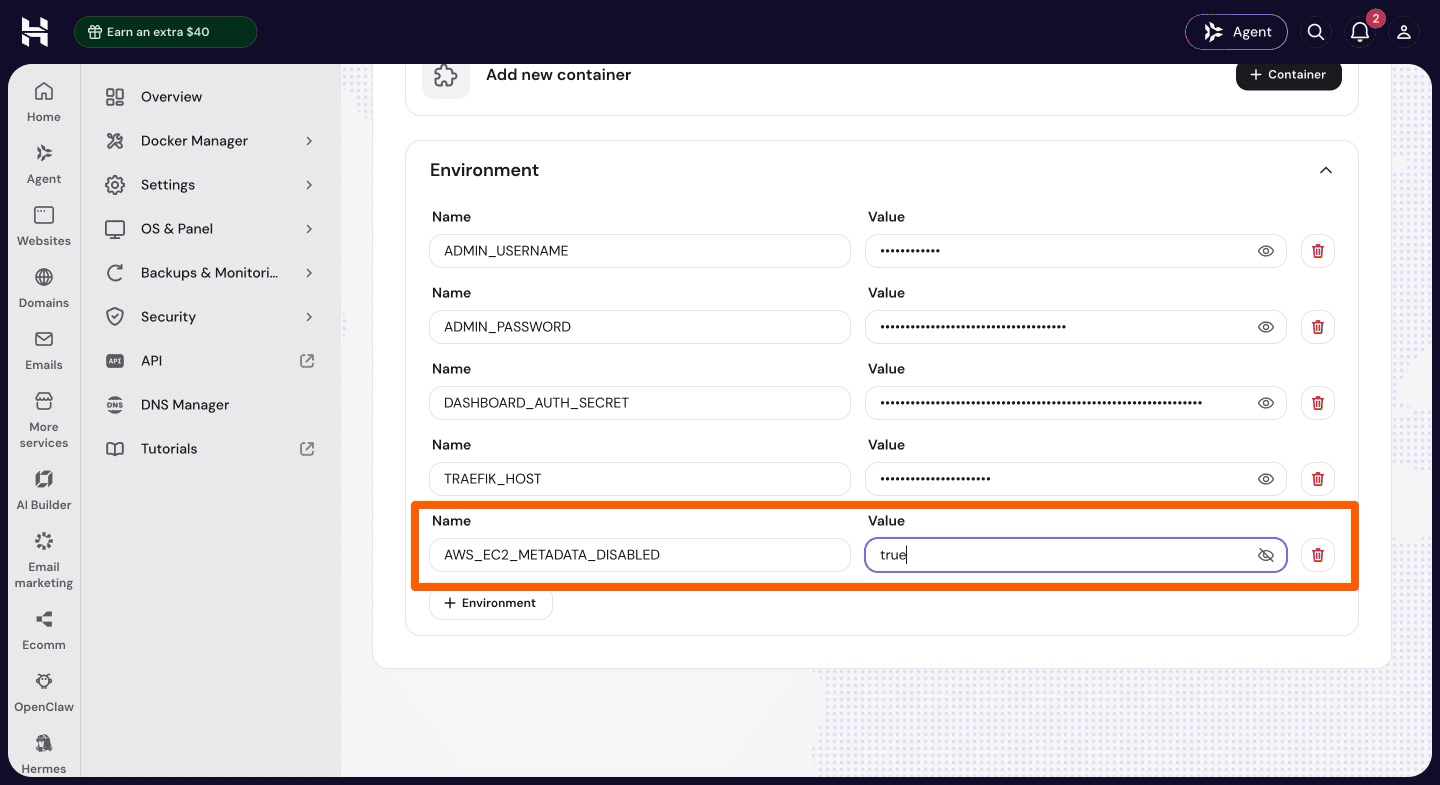
Hermes Chat tab still says “Setup Required”? Right after the login, the Chat tab kept showing the setup screen, even after clicking New chat, although the sidebar already listed the new model. The cause was the AWS lookup again. My terminal command had the
AWS_EC2_METADATA_DISABLED=trueprefix, but most likely the chat pane in the dashboard starts its own process without it. The fix is to set the variable permanently for the whole container: in the Docker Manager, open the Hermes project, go to Environment, add a variableAWS_EC2_METADATA_DISABLEDwith the valuetrue(plain letters, no special characters), save, and redeploy Hermes. After that, the Chat tab started normally.
- Test it in the Chat tab. After the redeploy, the chat starts normally: the banner shows
gpt-6-astra, 25 tools and 53 skills, and the status line says “ready”. Now open a new chat and try a prompt that is easy to verify, like:
Check my current directory and tell me what looks like the main project file.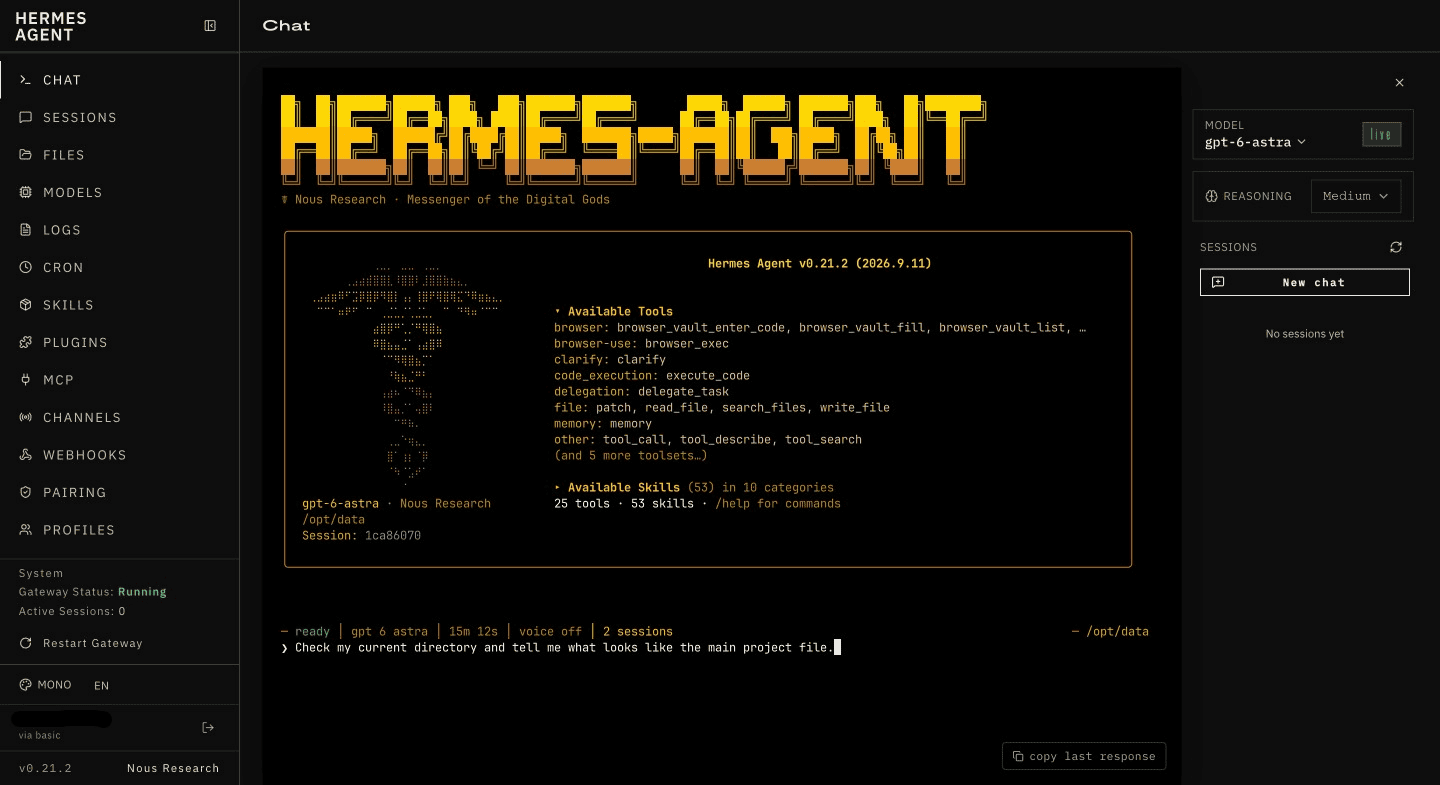
What success looks like, according to the quickstart: the banner shows your model, Hermes answers without an error, it uses a tool if needed, and the conversation keeps going for more than one turn. Afterwards, check the Sessions tab: your chat should show up there.
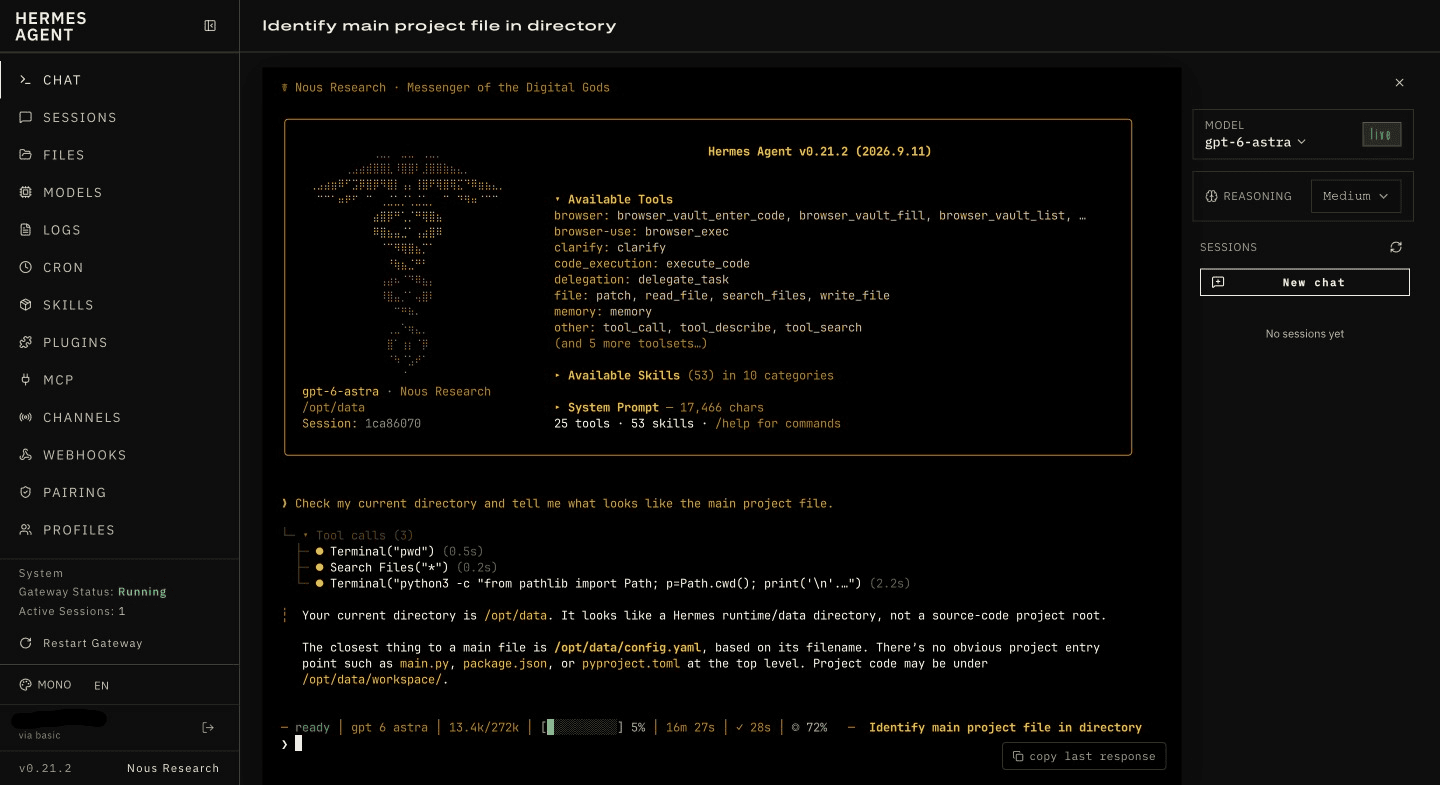
It worked on the first try. Hermes made three tool calls on its own (pwd, a file search and a small Python command) and answered that the current directory is /opt/data, a Hermes data directory rather than a project, with config.yaml as the closest thing to a main file. It even gave the chat a title by itself, and the status line showed about 13k of 272k tokens of context used.
3.2 Connect Discord
The dashboard already has a chat, so why add a messenger at all? Because it gives you Hermes on your phone, and it lets Hermes message you, for example with the result of a scheduled task. I’m starting with Discord.
Which messenger? A short version of my thinking before I picked one:
- The messenger matters less than two other things: who is allowed to talk to the bot (Hermes denies everyone who isn’t on an allowlist) and what the agent may do on the server (more on that in a later post).
- As far as I know, Signal is the most private option because it is end-to-end encrypted. Telegram and Discord use official bot APIs, but the platform can read the messages. WhatsApp runs through a reverse-engineered bridge on a linked device, so I’d keep it away from a personal number.
- For now I use Discord: quick to set up with an official bot, on a private server. One rule: no passwords, API keys or student data in that chat.
Do 3.1 first. Without a working model, the bot connects to Discord but has nothing to answer with.
Create the bot (in the Discord Developer Portal, following Hermes’ Discord guide):
- Create a private server first if you don’t have one, and use that for the bot. In Discord, click the + at the bottom of the server list, choose Create My Own, then For me and my friends, give it a name and click Create. A server you create yourself is invite-only: nobody can join without an invite link, so just don’t share one.
- In the Developer Portal, click New Application, give it a name, accept the terms and click Create. You land on the General Information page, where you’ll find the Application ID.
- Open Bot. Leave Require OAuth2 Code Grant off. Then decide on Public Bot: Hermes’ guide sets it to ON, because that is what Discord’s own install link needs. For a private bot, the guide says to use a manually built invite link, which is what the URL Generator in step 6 gives you. I’d rather keep it OFF, so nobody else can add my bot to their server. Discord may refuse to save with a validation error saying that private applications can’t have a default authorization link. In that case, open the Installation tab first, set Install Link to None, save, and then switch Public Bot off.
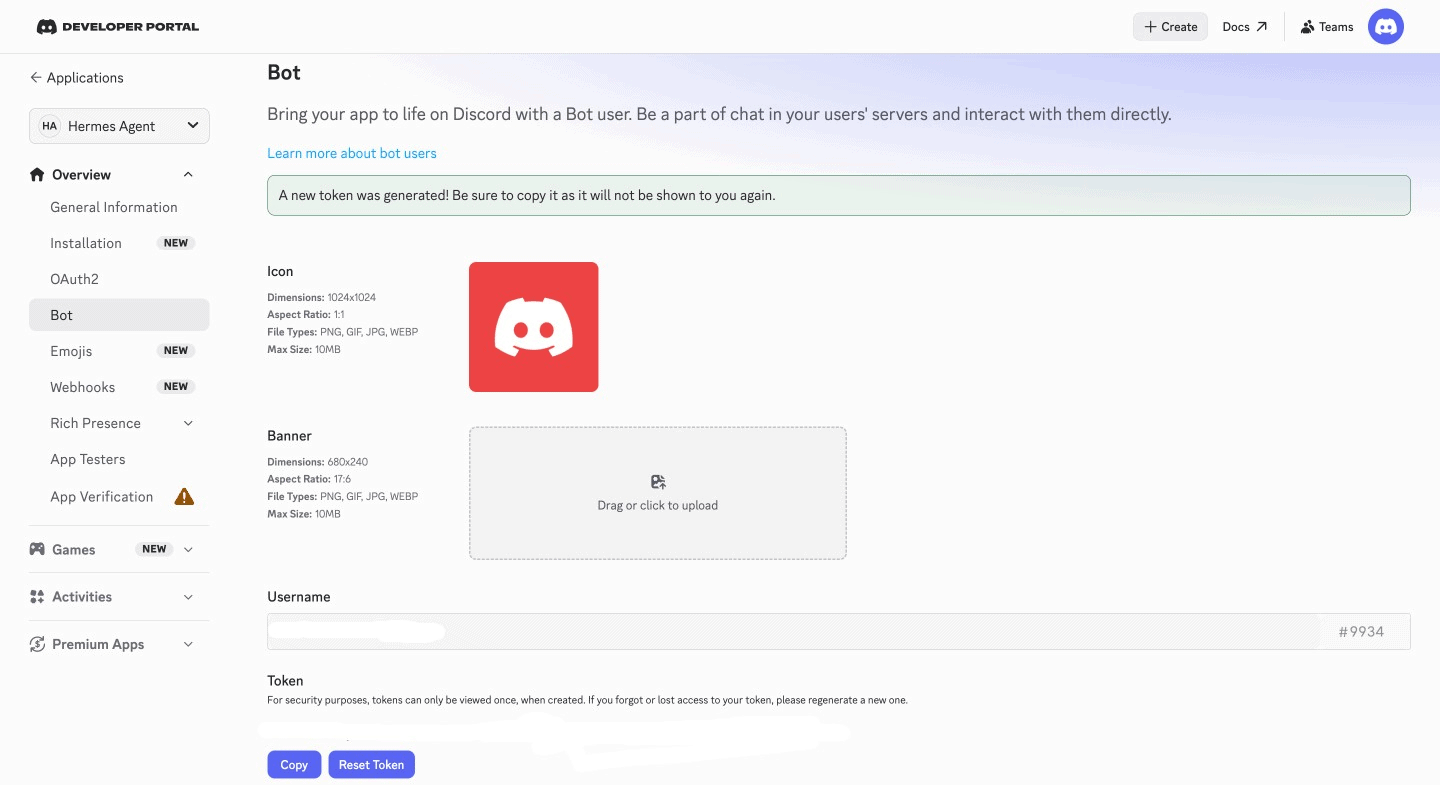
- Still on the Bot page, click Reset Token (enter your 2FA code if asked) and copy the token. It is shown only once, so put it straight into your password manager. Anyone with this token controls your bot.
- Under Privileged Gateway Intents, enable Message Content Intent and Server Members Intent, then click Save Changes. Without the Message Content Intent, the bot sees your messages as empty. Hermes needs the Server Members Intent for username and role allowlists, and the guide asks for it, so I switch it on as well. The Presence Intent stays off.
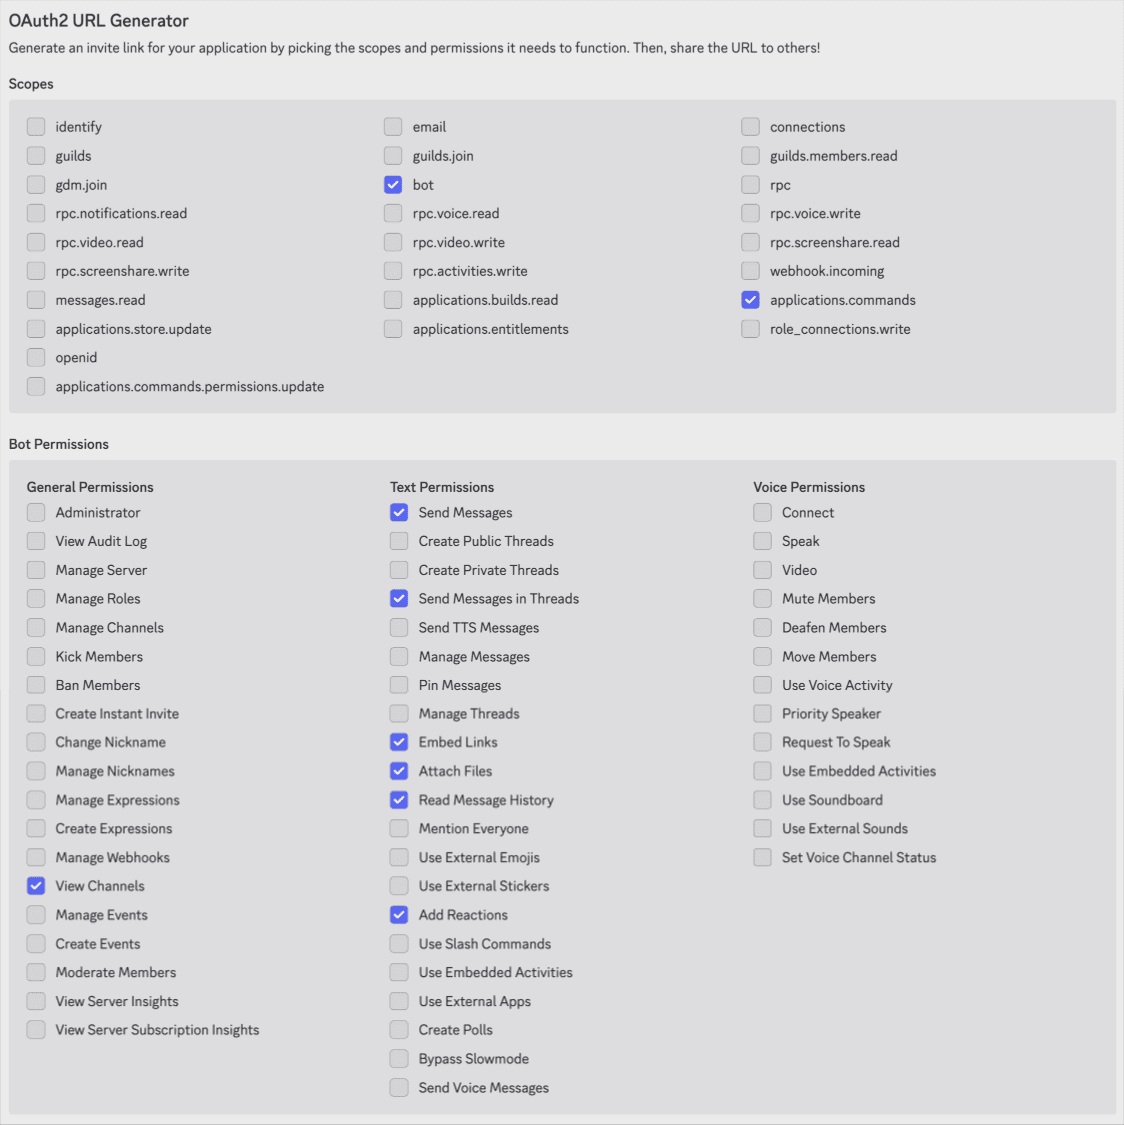
- Open OAuth2 → URL Generator.
- Scopes: tick only
botandapplications.commands. Leave everything else unticked. Bot permissions: once you tickbot, a permissions box appears below. Tick View Channels, Send Messages, Embed Links, Attach Files and Read Message History. Hermes’ guide also recommends Send Messages in Threads and Add Reactions. Don’t give the bot Administrator rights, it doesn’t need them.
- Scopes: tick only
- Generated URL: copy the link from the bottom of the page.
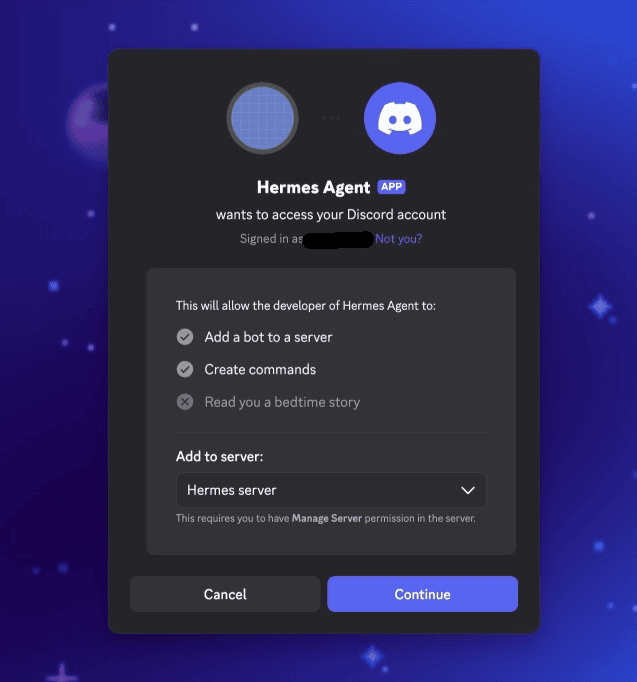
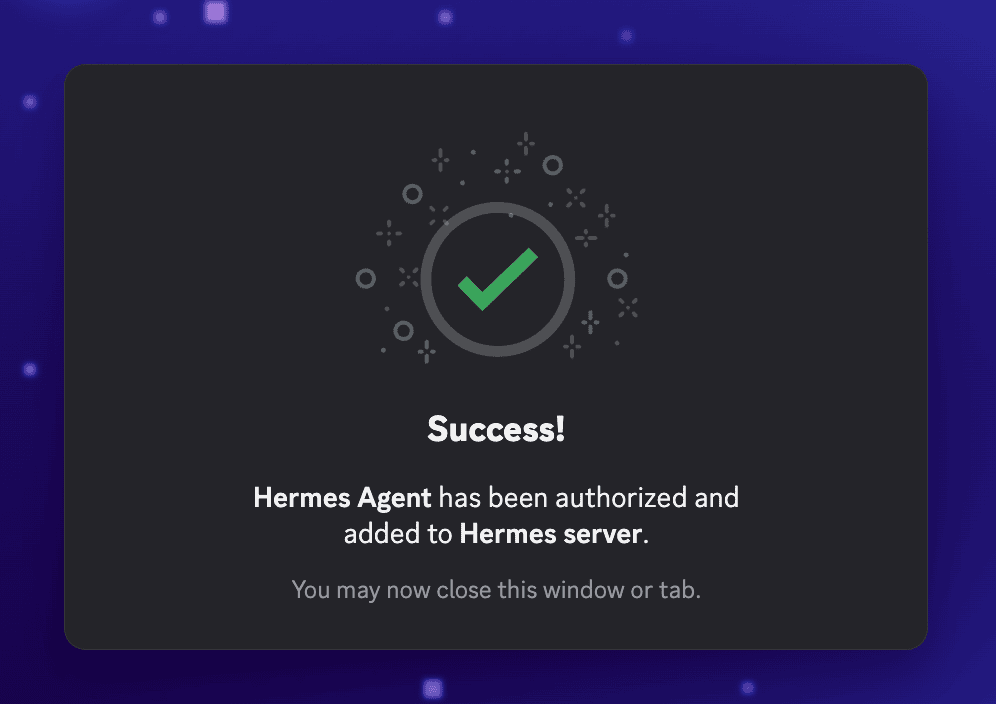
- Open the link, choose your private server, click Continue and Authorize, and solve the CAPTCHA if asked. You need the Manage Server permission on that server, which you have on your own. The bot then shows up in the member list as offline until Hermes connects.
- Copy your own Discord user ID. Click the gear icon next to your name (bottom left) to open User Settings. Many guides say to look for Advanced, but in the current Discord app the switch has its own entry called Developer, near the bottom of the left sidebar under Games & Apps. Open it and turn on Developer Mode. Then close the settings and click your own name at the bottom left. In the small profile window that opens, choose Copy User ID.
Connect it to Hermes:
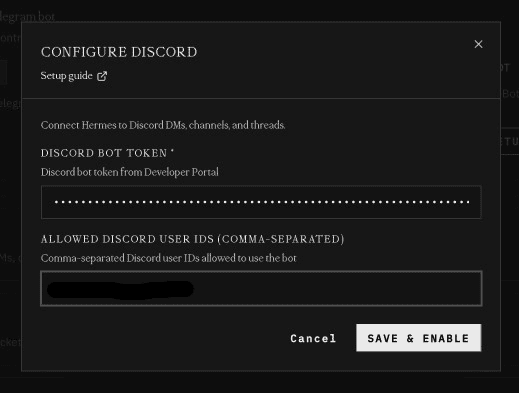
- In the dashboard, open Channels and pick Discord. Each channel has its own form, with a bot token field and an allowlist.
- Paste the bot token and enter your own user ID as the only allowed user. Hermes refuses all incoming Discord messages until an access policy exists, and I’d never use the “allow everyone” option.
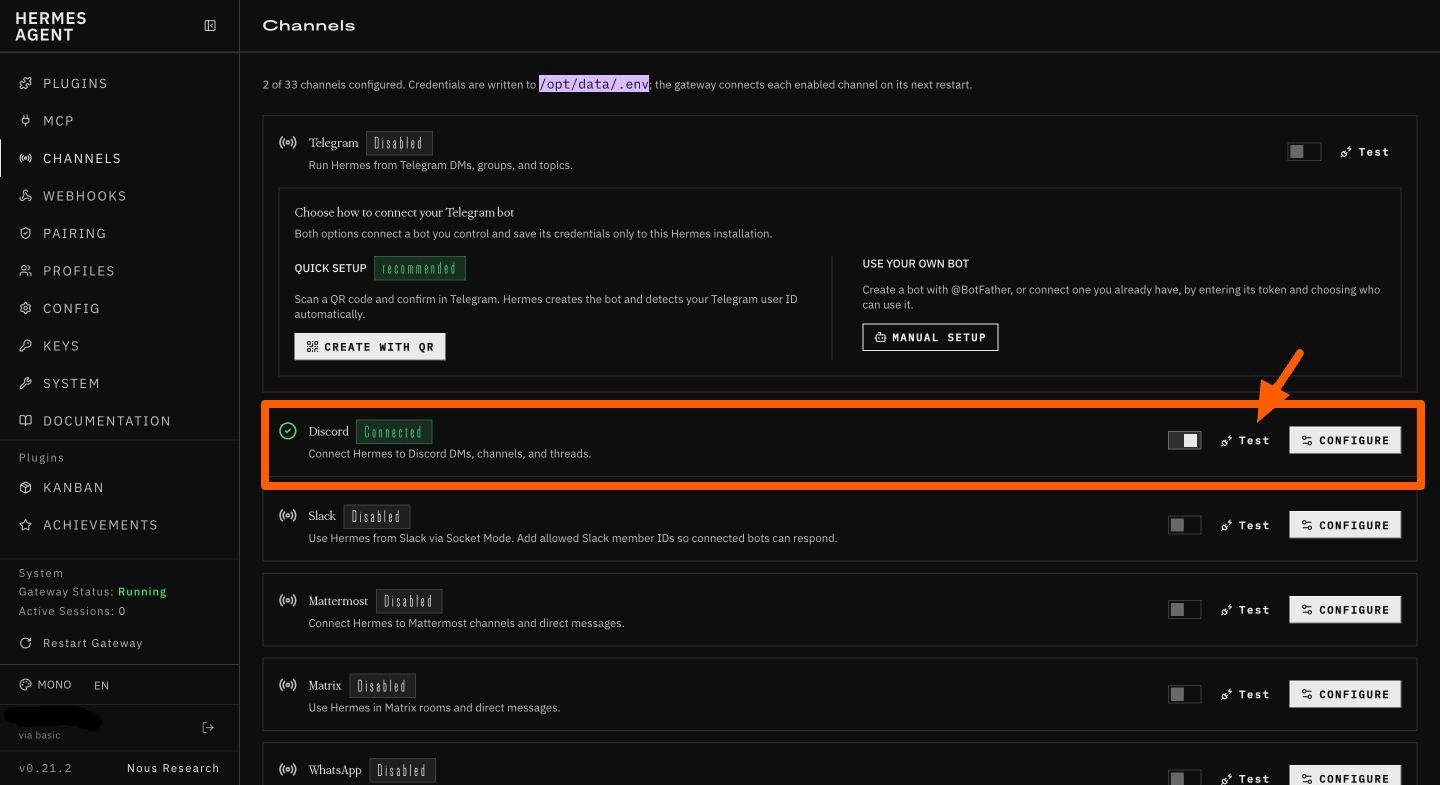
- Enable the channel and click Restart gateway. Then use the Test button, which reports whether the channel is configured, enabled and connected.
- Say hello. In a direct message, Hermes answers every message. In a server channel, it only answers when you @mention it, and that is what tripped me up: my first message in #general (“hi, where are you?”) got no answer at all. With the mention (
@BotName hi, where are you?), Hermes reacted with a ✅, opened a thread called “Locate conversation partner” and answered there. By default, Hermes starts a new thread for every @mention in a text channel. In that thread, it also pointed out that no home channel is set. The home channel is where Hermes delivers cron job results and cross-platform messages. Typing/sethomein a channel makes it the home channel. I skipped it for now.
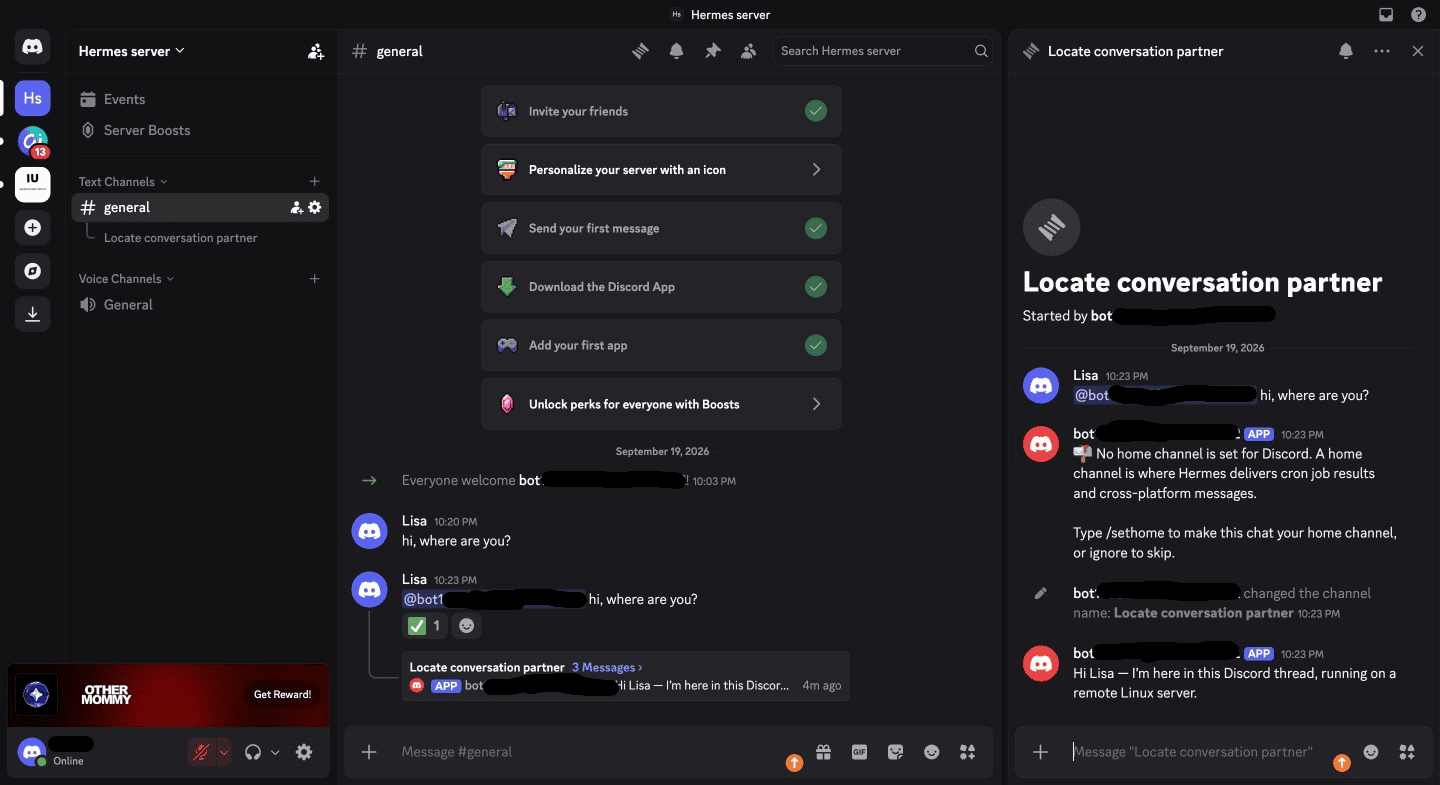
If the bot stays silent: Hermes’ Discord guide lists the usual suspects. In a server channel, you didn’t @mention the bot (that was my case). The gateway isn’t running or the token is wrong. Your user ID is missing from the allowlist (add it and restart the gateway). Or the bot’s role can’t see the channel (give it View Channel and Read Message History). If Discord rejects the connection because of intents, the gateway log names exactly which ones are missing. In my case, it was only the missing @mention.
Step 4: Close the public URL
Right now, my Hermes dashboard has a login page that anyone on the internet can open, provided they know (or find) the address. That login is the only thing standing between the internet and an agent that can run commands on my server. The Hermes docs recommend a different setup: keep the dashboard on the server itself and reach it through an SSH tunnel or Tailscale.
My goal for this post is simple: Hermes should only be reachable through Discord. Everything else (my own laptops, the Hermes desktop apps, SSH access) comes in the next post. For that, the public URL has to go.
What is actually exposed?
This is the Compose file of my Hermes project (Docker Manager → my project → YAML editor). I didn’t need to hide anything, because the secrets live in a separate .env file.
services:
  hermes-agent:
    image: ghcr.io/hostinger/hvps-hermes-agent:latest
    restart: unless-stopped
    ports:
      - "4860"
    labels:
      - traefik.enable=true
      - traefik.http.routers.${COMPOSE_PROJECT_NAME}.rule=Host(`${COMPOSE_PROJECT_NAME}.${TRAEFIK_HOST}`)
      - traefik.http.routers.${COMPOSE_PROJECT_NAME}.entrypoints=websecure
      - traefik.http.routers.${COMPOSE_PROJECT_NAME}.tls.certresolver=letsencrypt
      - traefik.http.services.${COMPOSE_PROJECT_NAME}.loadbalancer.server.port=4860
    env_file:
      - .env
    volumes:
      - ./data:/opt/data
Three things stand out:
- The Traefik labels publish Hermes under
https://<project name>.<server host name>with a Let’s Encrypt certificate. That is the address of the login page. Hostinger uses Traefik as a reverse proxy that listens on ports 80 and 443 and routes traffic to the right container by domain name. As far as I know, Let’s Encrypt certificates end up in public logs that scanners read, so a “secret” subdomain isn’t hidden. ports: - "4860"names only the container’s port. As far as I understand Docker’s short syntax, Docker then picks a random free port on the server and publishes it on all network interfaces. That would be a second door next to the HTTPS one, without encryption. To see the real port, I randocker ps --format 'table {{.Names}}\t{{.Ports}}'in the VPS shell (not inside the container; in the Docker Manager terminal, typeexitfirst to get back to the host). For my container it showed0.0.0.0:3xxxx->4860/tcp, [::]:3xxxx->4860/tcp(port number hidden). So my reading was right: Docker had published a random port on all interfaces, IPv4 and IPv6. Until the firewall, the login page was most likely reachable a second way, over plain http, without encryption.volumes: ./data:/opt/datais the only folder shared with the container. There is no privileged mode, no Docker socket and no host networking in this file. So Hermes lives inside a fence: it sees/opt/data, not the rest of the server, and not my laptops or cloud files. As a quick check, I randocker psinside the container’s own terminal, and it answered “Cannot connect to the Docker daemon”: from in there, Hermes can’t control Docker, which fits the file. But the fence isn’t a vault. The values from.env(tokens, passwords) reach the container as environment variables, and the container can still reach the internet.
The fix: Hostinger’s firewall
Why a firewall, and not editing the Compose file? Hostinger’s managed VPS firewall filters traffic before it reaches the server, and by default it drops everything you don’t explicitly allow. It closes both doors at once, the HTTPS route and the random port. I also don’t want to rely on the server’s own ufw here: Docker can bypass its rules, as Hostinger’s ufw tutorial points out. As far as I can tell, the Hostinger firewall isn’t switched on by default (as I don’t use the managed Hermes option).
- Optional safety net: a manual snapshot. In hPanel, open your VPS and go to Backups & Monitoring → Snapshots & Backups and create a snapshot. According to Hostinger, only one snapshot is kept at a time and it expires after a day. That is enough as an undo point while I change the network. I took one before changing anything.

- Create the firewall. In hPanel, open your VPS, go to Security → Firewall and click Add Firewall. Give it a name and click Create.
- Add the rule for SSH. On the firewall’s page, the form under Add firewall rule has the fields Action, Protocol, Port, Source and Source details. I chose action Accept, protocol TCP, port 22 and source Any. Hostinger states right on that page that the firewall drops all incoming traffic by default, so only the ports you allow stay reachable. Port 22 is SSH, my own way into the server (next post). I keep it open for now, because I don’t know whether the browser terminal in hPanel depends on it. If your home IP address never changes, you could limit the rule to that address with the Source fields, but with a changing IP that can lock you out. My rule list has two entries: the Accept rule for TCP 22 that I added and, below it, a Drop rule for everything else, which was already there when the firewall was created.
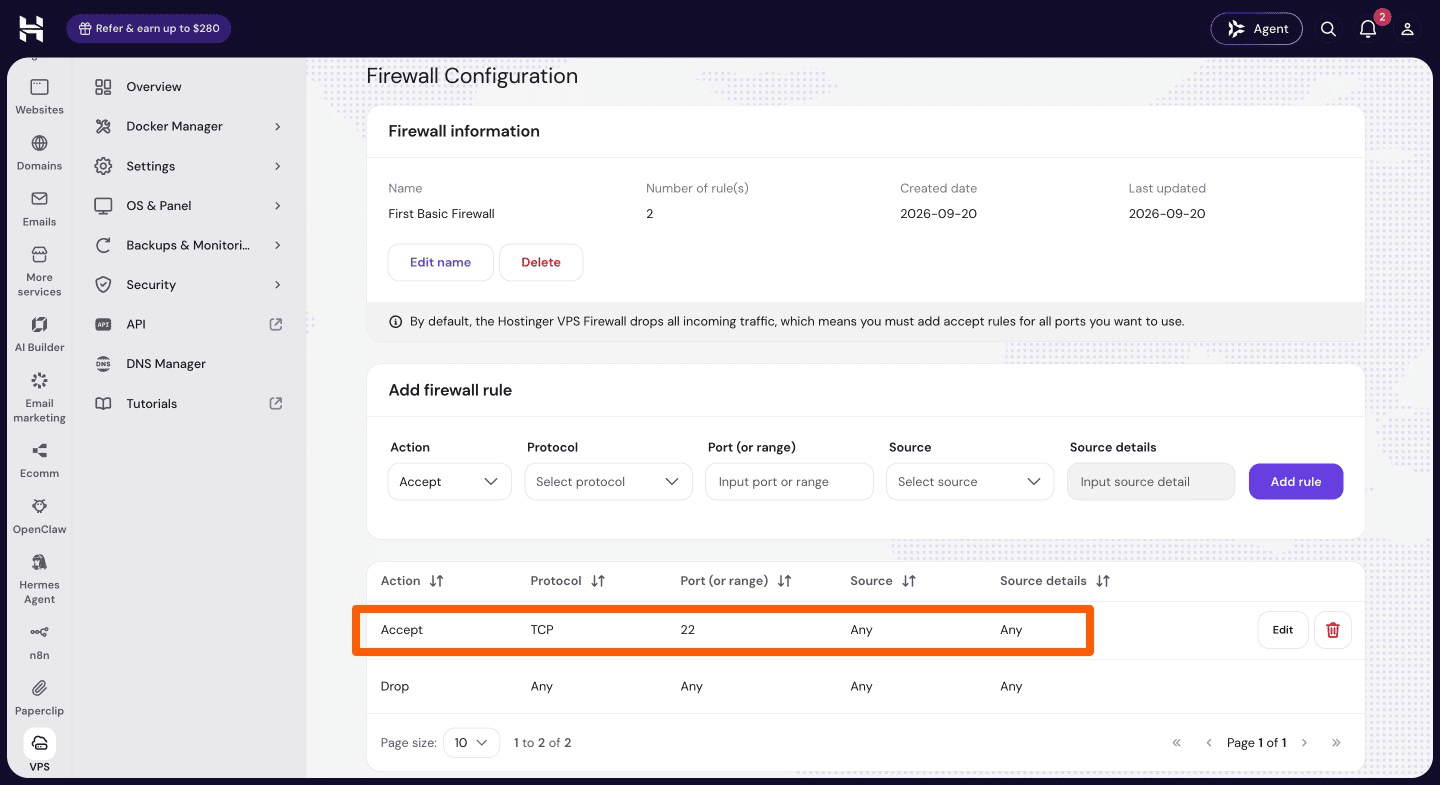
- Activate the firewall for your VPS. If hPanel asks you to sync it, do that as well. Rule changes only apply to new connections.
- Test it.
- Open the Hermes address in a private window, or better on your phone with mobile data. It should no longer load. For me, the private window kept loading and never showed anything.
- Message the Discord bot with an @mention: it should still answer. The gateway opens its connection to Discord from the inside, so it doesn’t need incoming traffic. Mine still answered.
- Check that the Docker Manager and its terminal in hPanel still work. They did for me.
- Try the second door: open
http://<your server's host name>:<that port>in a private window or on your phone. Use plain http, and the server’s own host name from the VPS overview page in hPanel, not the Hermes address with the project prefix. It should not load either. A phone on mobile data is a good test, because it may reach the server over IPv6 as well. Mine didn’t load, so both doors are closed.
Heads-up: my old browser tab kept working for a while. Hostinger says rule changes only apply to new connections, and my open tab still had its connection. After I signed out of hPanel and back in, even that window lost access to Hermes. So don’t trust the tab you already had open, test in a fresh one.
If something goes wrong: according to Hostinger, you can regain access by resetting the firewall from the VPS dashboard, and the snapshot from step 1 is your undo point.
Why SSH first, and what about Tailscale? With the firewall in place, SSH is the one door left. In the next post I’ll harden it (keys instead of a password, no root login), and then reach the dashboard and the Hermes desktop apps through an SSH tunnel. Tailscale is possible in principle, too: it would let me close port 22 as well, at the price of one more service and account to trust. That’s an experiment for later.
What I did not touch: Hermes’ own permissions. This is my playground, and I don’t want to restrict what Hermes can do too early. One thing I noticed, though: in my first test, Hermes ran three commands on the server without asking me first. I’ll look at that in a later post (see the notes below).
Where I got stuck
- Sign-in failed with “Invalid username or password”, although the credentials were correct. Solved by using a password without special characters (see step 2).
- Enter did nothing on “ChatGPT or Codex Subscription” in the
/modelpicker. The OAuth login has to be started withhermes modelin a real terminal, for example the container terminal in Docker Manager (see step 3.1). hermes modelseemed to freeze before the provider list appeared, even in a real terminal. A known bug in v0.21.2 (a provider lookup that calls itself, plus slow AWS metadata probes). See the notes in step 3.1.- The Chat tab stayed on “Setup Required” after a successful login. Fix: set
AWS_EC2_METADATA_DISABLED=truepermanently under Environment in the Docker Manager and redeploy (see step 3.1). - No answer from the Discord bot in #general. In server channels, Hermes only answers when it is @mentioned (see step 3.2).
What’s next
Hermes is running, and it can only be reached through Discord apart from SSH. Along the way I collected a few things for the next posts of Weekend Rabbit Holes:
- Reaching Hermes safely from my laptops. SSH hardening (keys, no root login), an SSH tunnel to the dashboard, and the Hermes desktop apps on Mac and Windows. Hermes Desktop also has a connection type that reaches a Hermes install over SSH, and whether that fits a Docker setup like mine is an open question. Tailscale as an alternative may become a later experiment.
- More models. GPT and Claude (via subscription or API), open-source models through OpenRouter, which model fits which agent, and what all of it costs.
- Email, calendar and Drive. As a sandbox, with separate accounts for Hermes and only selected things shared into them, never my main accounts.
- Backups. Hostinger includes free weekly backups and a manual snapshot, and Hermes has its own backup command. The goal would be an automated, encrypted copy outside the server. I’m not setting this up in this post, because it deserves its own careful walk-through, including a test restore.
- What Hermes is allowed to do. Approval mode and tool permissions. I want to understand the options before I change anything.
Sources
- Hostinger Help: Get started with Hermes Agent on a VPS
- Hostinger Tutorial: How to set up Hermes Agent
- Hermes Docs: Quickstart
- Hermes Docs: Web Dashboard
- Hermes Docs: Discord
- Hermes Docs: Security
- Hermes Docs: LLM and Model Providers
- Hermes Docs: Connecting Desktop to Many Hermes Instances
- Hermes Docs: CLI Commands Reference
- Hostinger Help: Docker Manager
- Hostinger Help: Traefik in Docker Manager
- Hostinger Help: VPS browser terminal
- Hostinger Help: Managed VPS firewall
- Hostinger Help: Back up or restore a VPS
- Hostinger Help: Firewall at Hostinger VPS (recovery)
- Hostinger Tutorial: Configure UFW on Ubuntu
- Hermes GitHub: TUI model picker fix for OAuth providers (PR #90817)
- Hermes GitHub:
hermes modelfreezes on provider auto resolution (Issue #110926) - Fastio: Hermes Agent as a WhatsApp bot